! REPORT
Digital Fashion - Exploring History with Modern Technology
3D Render by AlodiaTHE CONCEPT -
Patterns of Fashion, the classic Janet Arnold book series currently published by The School of Historical Dress, is an exploration, documentation, and meticulous breakdown of extant historical garments. Janet's goal was to find new insight into historical sewing methods by creating patterns for said garments, photographing them, and assembling her knowledge into books, and passing whatever she could onto her students.
When she passed, she had completed three books, and The School of Historical Dress has a mission to continue her work, having published a fourth, fifth, and sixth, book since her passing. These books are the bibles from which historical costumers study, and there is no greater assembly of knowledge on historical sewing and construction methods than in her books.
She used all the latest technology available to her at the time to do her work, and it is the belief of many that she would have delighted in modern methods to continue her work - colored photos, for example, which would allow her to convey even greater detail of the garments she spent her life studying.
When I considered the theme of this contest, I thought about the future, which, inevitably, led me to think of the past, and of how Janet might have used modern tools to explore historical fashion.
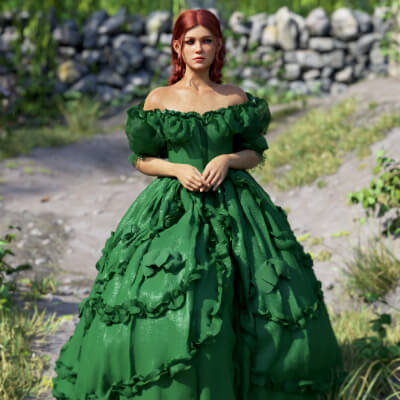
My entry for the contest directly references Janet's work: Using her patterns, digitizing them, and recreating garments in Marvelous Designer, I'm able to create historically accurate garments that can be experienced in a new way, while also garnering a greater understanding of patterning, tailoring, and historical methods. Not only does this create beautiful clothing, but it does so in a way that can be shared and appreciated by many outside of a museum setting. Too often we only see clothing like this behind glass or re-created on a movie screen, but by creating this 1860s gown for Daz3D, it can be put into the hands of anyone, used to create art of all kinds, and to bring appreciation for fashion history, and pulling that history into the modern era.
For me, this is what the history of fashion, and its future, means. It means accessibility in style, and the ability to explore in ways we only could have dreamed of before.
-------------------
ABOUT THIS GOWN -
The 1860s was all about color and volume. Synthetic dyes came on the scene, allowing dazzling shades never seen before in salons and ballrooms all across Europe. Vibrant purples, deep reds, vibrant yellows, and blues, all colors previously prohibitively expensive, were now much more affordable. Though all fabric was still a luxury, these colors were now much less rare than before.
These colors were seen as 'gaudy', at first, but attitudes shifted quickly. Particularly, purple, previously only made from snails and reserved for royalty and clergy, was wildly successful, and allowed for the funds for more dyes to be created. What started as a happy by-product of a failed malaria drug experiment changed the face of fashion in a matter of a few short years.
The 1860s also brought about the birth of modern couture with the House of Worth - a Parisian fashion house that would dress anyone who was anyone.
This dress is inspired by both the birth of couture and vibrant colors, and informed by Janet's impeccable work in documenting patterns and methods from the 1860s. I imagined the wearer of this gown to be attending one of the famous Fancy Dress balls of the 1860s, decked out in her finest dress and jewels.
-------------------
THE PROCESS -
I started, as all historical costumers must, with a base layer. This is especially important in digital fashion, as we need to give our clothes a base to simulate around. Just like in real life, fabric will fall flat and close to the body of our model if we don't give it a petticoat to support it and hold it in the proper shape.
By using pressure and some addional layers for weight and shape, I was able to create a petticoat with an 1860s silhouette to drape my garment over.
Then, I worked on the pattern for the main dress. By referencing an 1860s wedding dress, and the sleeves of an 1830s evening dress, both cataloged in Patterns of Fashion 1, I was able to create a historically faithful pattern. The bodice consists of three pieces, mirrored from one side to the other, and is fit to the body using clever seam work. Since my dress is made for Genesis 9, some of the curves in the pattern were adjusted to fir a gender neutral frame, but the fit is still undeniably great.
The skirt was a more interesting tale. Initially I thought to make the skirt and bodice in two pieces, but when it came down to it, the bodice would not lay correctly. So I turned to patterns of fashion, and realized the solution was there in history. Faced with a similar problem, and not wanting gaps in the garment, the backs of skirts were sewn to the bodice, and the front half of the skirt would be tied around the waist. I did the same with my gown, attaching the bach half of my skirt to the back of the bodice, and then leaving the front to hang. Then, I created an improvised waist tape, by adapting the waistband of my original skirt to fit snugly under the bodice.
This left me with making the front fit as intended. The bodice of the gown has a point at the front, which extends down over the skirt and helps create the illusion of a smaller waist. Getting this to lay as flat as possible, while at the same time covering the waist tape and top of the skirt, was a challenge. Historically, pins would be used to ensure everything laid where it should and was secured in place, and I used this as inspiration for solving my problem. Using tacks, and a little bit of free sewing, I got the bodice laying correctly.
Last was detailing the dress. No 1860s gown is complete without details, and Marvelous Designer made it wasy for me to deck this gown out in a way that would make the Victorians proud. For inspiration, I referenced Empress Sisi's famous star gown, a portrait of Princess Metternich in a white gown painted in 1860, and a peach silk evening gown in the collection of the Met, as well as Janet's illustrations of details in the gowns she cataloged.
I started by adding some ruffles and other details along the bodice and on the skirt, and then went to tackle the sleeves. Ask any sewist, and most of them will tell you that sleeves are the hardest part of any garment, and this was no exception. Construction of sleeves is one of the things that has changed the most through history, and 1860s sleeves came in many shapes, sizes, and degrees of poofyness. I knew I wanted sleeves as poofy as possible, so I started first by creating a puff using a circular pattern and some pressure. I attached this to an armband and then to the bodice. This was finished with some bands, which we'll convert to lace later with opacity maps, and last, we just have detail work for our model.
Bows were a big part of 1860s gowns, and I wanted to include them on my gown as well. First, I made a single base bow in marvelous designer and imported it as a trim, then I also created several large fabric bows in the main garment file itself. I distributed these along the bodice and skirt, and I could see everything coming together exactly as I'd pictured it. The dress was turning into a sumptuous, lush gown, suitable for any 1860s lady. All it needed now was some detail at the bodice. More draping fabric, more bows, and we came to a place where I was comfortable exporting the gown to blender for adjustments.
After optimizing the gown for Quads in MD, I merged the garment and made small adjustments to its shaping in Blender to tame the little bits that just would not behave in Marvelous Designer. This created a clean, crisp gown that looked exactly as I'd intended. This is also where I do things like adjust where the sleeves fall, so that Daz 3D has an easier time with its automatic weight mapping.
Then, the dress was sent to Daz, where I applied physics, adjusted the weight maps, and applied my materials. All materials were first assembled or created in Photoshop before being applied to the dress, and included hand-made materials, and lots of fussing and adjusting until the dress looked just right.
-------------------
THE CONCLUSION -
This project was primarily meant for me to learn- to force myself to develop a greater understanding both for historical garments and for Marvelous Designer. I learned that, indeed, historical methods can and should inform our modeling when it comes to digital fashion, and that new tools doesn't mean we have to reinvent fashion from scratch. Instead, we bring the history of fashion with us into the future, and expand on the knowledge base of those who came before us.
Thank you so much for reading, looking at my entry, and for coming with me on this journey! I hope you love the final dress as much as I do, and it will be available in the store soon.
You can read more about Janet here: https://theschoolofhistoricaldress.org.uk/?page_id=124
Patterns of Fashion, the classic Janet Arnold book series currently published by The School of Historical Dress, is an exploration, documentation, and meticulous breakdown of extant historical garments. Janet's goal was to find new insight into historical sewing methods by creating patterns for said garments, photographing them, and assembling her knowledge into books, and passing whatever she could onto her students.
When she passed, she had completed three books, and The School of Historical Dress has a mission to continue her work, having published a fourth, fifth, and sixth, book since her passing. These books are the bibles from which historical costumers study, and there is no greater assembly of knowledge on historical sewing and construction methods than in her books.
She used all the latest technology available to her at the time to do her work, and it is the belief of many that she would have delighted in modern methods to continue her work - colored photos, for example, which would allow her to convey even greater detail of the garments she spent her life studying.
When I considered the theme of this contest, I thought about the future, which, inevitably, led me to think of the past, and of how Janet might have used modern tools to explore historical fashion.
My entry for the contest directly references Janet's work: Using her patterns, digitizing them, and recreating garments in Marvelous Designer, I'm able to create historically accurate garments that can be experienced in a new way, while also garnering a greater understanding of patterning, tailoring, and historical methods. Not only does this create beautiful clothing, but it does so in a way that can be shared and appreciated by many outside of a museum setting. Too often we only see clothing like this behind glass or re-created on a movie screen, but by creating this 1860s gown for Daz3D, it can be put into the hands of anyone, used to create art of all kinds, and to bring appreciation for fashion history, and pulling that history into the modern era.
For me, this is what the history of fashion, and its future, means. It means accessibility in style, and the ability to explore in ways we only could have dreamed of before.
-------------------
ABOUT THIS GOWN -
The 1860s was all about color and volume. Synthetic dyes came on the scene, allowing dazzling shades never seen before in salons and ballrooms all across Europe. Vibrant purples, deep reds, vibrant yellows, and blues, all colors previously prohibitively expensive, were now much more affordable. Though all fabric was still a luxury, these colors were now much less rare than before.
These colors were seen as 'gaudy', at first, but attitudes shifted quickly. Particularly, purple, previously only made from snails and reserved for royalty and clergy, was wildly successful, and allowed for the funds for more dyes to be created. What started as a happy by-product of a failed malaria drug experiment changed the face of fashion in a matter of a few short years.
The 1860s also brought about the birth of modern couture with the House of Worth - a Parisian fashion house that would dress anyone who was anyone.
This dress is inspired by both the birth of couture and vibrant colors, and informed by Janet's impeccable work in documenting patterns and methods from the 1860s. I imagined the wearer of this gown to be attending one of the famous Fancy Dress balls of the 1860s, decked out in her finest dress and jewels.
-------------------
THE PROCESS -
I started, as all historical costumers must, with a base layer. This is especially important in digital fashion, as we need to give our clothes a base to simulate around. Just like in real life, fabric will fall flat and close to the body of our model if we don't give it a petticoat to support it and hold it in the proper shape.
By using pressure and some addional layers for weight and shape, I was able to create a petticoat with an 1860s silhouette to drape my garment over.
Then, I worked on the pattern for the main dress. By referencing an 1860s wedding dress, and the sleeves of an 1830s evening dress, both cataloged in Patterns of Fashion 1, I was able to create a historically faithful pattern. The bodice consists of three pieces, mirrored from one side to the other, and is fit to the body using clever seam work. Since my dress is made for Genesis 9, some of the curves in the pattern were adjusted to fir a gender neutral frame, but the fit is still undeniably great.
The skirt was a more interesting tale. Initially I thought to make the skirt and bodice in two pieces, but when it came down to it, the bodice would not lay correctly. So I turned to patterns of fashion, and realized the solution was there in history. Faced with a similar problem, and not wanting gaps in the garment, the backs of skirts were sewn to the bodice, and the front half of the skirt would be tied around the waist. I did the same with my gown, attaching the bach half of my skirt to the back of the bodice, and then leaving the front to hang. Then, I created an improvised waist tape, by adapting the waistband of my original skirt to fit snugly under the bodice.
This left me with making the front fit as intended. The bodice of the gown has a point at the front, which extends down over the skirt and helps create the illusion of a smaller waist. Getting this to lay as flat as possible, while at the same time covering the waist tape and top of the skirt, was a challenge. Historically, pins would be used to ensure everything laid where it should and was secured in place, and I used this as inspiration for solving my problem. Using tacks, and a little bit of free sewing, I got the bodice laying correctly.
Last was detailing the dress. No 1860s gown is complete without details, and Marvelous Designer made it wasy for me to deck this gown out in a way that would make the Victorians proud. For inspiration, I referenced Empress Sisi's famous star gown, a portrait of Princess Metternich in a white gown painted in 1860, and a peach silk evening gown in the collection of the Met, as well as Janet's illustrations of details in the gowns she cataloged.
I started by adding some ruffles and other details along the bodice and on the skirt, and then went to tackle the sleeves. Ask any sewist, and most of them will tell you that sleeves are the hardest part of any garment, and this was no exception. Construction of sleeves is one of the things that has changed the most through history, and 1860s sleeves came in many shapes, sizes, and degrees of poofyness. I knew I wanted sleeves as poofy as possible, so I started first by creating a puff using a circular pattern and some pressure. I attached this to an armband and then to the bodice. This was finished with some bands, which we'll convert to lace later with opacity maps, and last, we just have detail work for our model.
Bows were a big part of 1860s gowns, and I wanted to include them on my gown as well. First, I made a single base bow in marvelous designer and imported it as a trim, then I also created several large fabric bows in the main garment file itself. I distributed these along the bodice and skirt, and I could see everything coming together exactly as I'd pictured it. The dress was turning into a sumptuous, lush gown, suitable for any 1860s lady. All it needed now was some detail at the bodice. More draping fabric, more bows, and we came to a place where I was comfortable exporting the gown to blender for adjustments.
After optimizing the gown for Quads in MD, I merged the garment and made small adjustments to its shaping in Blender to tame the little bits that just would not behave in Marvelous Designer. This created a clean, crisp gown that looked exactly as I'd intended. This is also where I do things like adjust where the sleeves fall, so that Daz 3D has an easier time with its automatic weight mapping.
Then, the dress was sent to Daz, where I applied physics, adjusted the weight maps, and applied my materials. All materials were first assembled or created in Photoshop before being applied to the dress, and included hand-made materials, and lots of fussing and adjusting until the dress looked just right.
-------------------
THE CONCLUSION -
This project was primarily meant for me to learn- to force myself to develop a greater understanding both for historical garments and for Marvelous Designer. I learned that, indeed, historical methods can and should inform our modeling when it comes to digital fashion, and that new tools doesn't mean we have to reinvent fashion from scratch. Instead, we bring the history of fashion with us into the future, and expand on the knowledge base of those who came before us.
Thank you so much for reading, looking at my entry, and for coming with me on this journey! I hope you love the final dress as much as I do, and it will be available in the store soon.
You can read more about Janet here: https://theschoolofhistoricaldress.org.uk/?page_id=124
Some other colors I put together for this look, some inspired by the above-mentioned aniline dyes, and others more of the softer, natural dyes of the era, and a few just for fun. FYI - The lighting of this scene is quite warm, evoking candlelight and a roaring fire, and does warm up the colors a touch.
ANILINE MAUVE -

BLACK AND WHITE -

BLACK AND WHITE STRIPES -

PINK AND WHITE -

GREEN STRIPES -

FYI - The lighting of this scene is quite warm, evoking candlelight and a roaring fire, and does warm up the colors a touch. ANILINE MAUVE -
BLACK AND WHITE -
BLACK AND WHITE STRIPES -
PINK AND WHITE -
GREEN STRIPES -
REPLY
! REPORT


Digital Fashion - Exploring History with Modern Technology
[+] Give Award


Sat, Jul 26, 2025 368
368
 2
2
36811
2
Add to Collection

11 Likes
Share This Render


Software Used
Artist Stats
Member Since:
Karma:
Followers:
Likes Received:
Karma:
Followers:
Likes Received:
Aug, 2022
331
16
40
331
16
40
Gallery Images:
Wallpaper Images:
Forum Topics:
Marketplace Items:
Wallpaper Images:
Forum Topics:
Marketplace Items:
1
0
0
7
0
0
7

3