! REPORT
MaskIT (Info)
3D Render by Pushee-RiHere is the information that is also contained in my product.
-------------------------------------------------------------------------------------------------
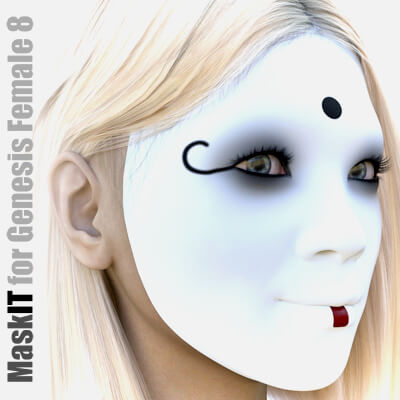
MaskIT allows you to create your own face mask from 85+ individual textures. Thousands of
combinations and countless variations are possible.
* Suggested start settings
* Getting started
* Using the Moveables
* Going further ... and further .. and ...
* Known issues
* Saving a Scene Subset
-------------------------------------------------------------------------------------------------
SUGGESTED START SETTINGS
To make it as easy as possible when saving a Scene Subset (see below), I recommend loading the
model without clothes or hair in an empty scene and not positioning it.
-------------------------------------------------------------------------------------------------
GETTING STARTED
1) Use the script "1st Create Base" to create the base shell object. The script creates a
"MKT BASE" object for you and selects it.
2) With "2nd Assign Mask Material" you can apply the white full face mask. There are also
half face masks, but to start with I would suggest working with the full mask.
3) Now switch to Materials -> Iray where you can find several subfolders like "Eyes",
"Lips" etc. Each folder contains a "1st Create ..." script. Use it, before you assign
additional materials. Keep in mind: you can create several shells from the same subfolder.
-------------------------------------------------------------------------------------------------
USING THE MOVEABLES
With the "MKT Moveable" object selected, switch to the "Surfaces" pane and scroll down the list
of options until you see "Horizontal offset" or "Vertical offset". If you change the
values (slightly!), you will see how the texture change the position on the face of the model.
You can also use the "Tiles" options to scale the materials. Smaller values enlarge the material,
larger values reduce it ... and can also lead to doubling, as the changed value is a "Tile" option.
-------------------------------------------------------------------------------------------------
GOING FURTHER ... AND FURTHER ... AND ...
STEP 1:
It doesn't always have to be a full load of all textures or categories. Sometimes less is more.
Depending on the scene and genre, a white face and black lips might be enough. Try it out!
Not quite far enough?
STEP 2:
All material presets are based on 2 settings: "Cutout Opacity" and "Base Color". You can easily
change the color by selecting the "Face" group (and sometimes also "Lips") in the "Surfaces" pane
and changing the Base Color as usual via a color dialog.
Not quite far enough?
STEP 3:
With the "Cutout Opacity" mentioned you can regulate the transparency - including that of the base
mask. Just give it a try.
Not quite far enough?
STEP, STEP, STEP ....
Start experimenting! It's fun and sometimes leads to unexpectedly great results. Promised
-------------------------------------------------------------------------------------------------
KNOWN ISSUES
Although the product has been tested several times and with different characters, in combination
with some (few) hair and clothing items, display errors may occur. Don't ask me what "goodies" the
guys have built into their hair/cloth products ...
You can recognize the mistakes by the fact that parts of the mask are missing, the model's skin
shows through and the whole thing looks half-burnt. The only way to fix this is to remove the
hair/clothing again. Please excuse this - even if the fault is not with my product.
-------------------------------------------------------------------------------------------------
SAVING A SCENE SUBSET
If you have followed my instructions above, this is very easy: Click File -> Save as -> Scene Subset
Choose a folder, enter a name and click "Save". A dialog box appears. Only select your model in this
dialog box. If you have lights, cameras or similar in the scene: untick! If you have switched on
Iray when creating the mask and see "Environment Options" or "Tone Mapping": untick!
After saving, you can load the model wearing your mask into any scene - or even better:
merge it into the scene. To merge (instead of loading), right-click on the icon of the saved
Scene Subset and select "Merge into Scene" from the context menu that opens. That's it.
-------------------------------------------------------------------------------------------------
MaskIT allows you to create your own face mask from 85+ individual textures. Thousands of
combinations and countless variations are possible.
* Suggested start settings
* Getting started
* Using the Moveables
* Going further ... and further .. and ...
* Known issues
* Saving a Scene Subset
-------------------------------------------------------------------------------------------------
SUGGESTED START SETTINGS
To make it as easy as possible when saving a Scene Subset (see below), I recommend loading the
model without clothes or hair in an empty scene and not positioning it.
-------------------------------------------------------------------------------------------------
GETTING STARTED
1) Use the script "1st Create Base" to create the base shell object. The script creates a
"MKT BASE" object for you and selects it.
2) With "2nd Assign Mask Material" you can apply the white full face mask. There are also
half face masks, but to start with I would suggest working with the full mask.
3) Now switch to Materials -> Iray where you can find several subfolders like "Eyes",
"Lips" etc. Each folder contains a "1st Create ..." script. Use it, before you assign
additional materials. Keep in mind: you can create several shells from the same subfolder.
-------------------------------------------------------------------------------------------------
USING THE MOVEABLES
With the "MKT Moveable" object selected, switch to the "Surfaces" pane and scroll down the list
of options until you see "Horizontal offset" or "Vertical offset". If you change the
values (slightly!), you will see how the texture change the position on the face of the model.
You can also use the "Tiles" options to scale the materials. Smaller values enlarge the material,
larger values reduce it ... and can also lead to doubling, as the changed value is a "Tile" option.
-------------------------------------------------------------------------------------------------
GOING FURTHER ... AND FURTHER ... AND ...
STEP 1:
It doesn't always have to be a full load of all textures or categories. Sometimes less is more.
Depending on the scene and genre, a white face and black lips might be enough. Try it out!
Not quite far enough?
STEP 2:
All material presets are based on 2 settings: "Cutout Opacity" and "Base Color". You can easily
change the color by selecting the "Face" group (and sometimes also "Lips") in the "Surfaces" pane
and changing the Base Color as usual via a color dialog.
Not quite far enough?
STEP 3:
With the "Cutout Opacity" mentioned you can regulate the transparency - including that of the base
mask. Just give it a try.
Not quite far enough?
STEP, STEP, STEP ....
Start experimenting! It's fun and sometimes leads to unexpectedly great results. Promised

-------------------------------------------------------------------------------------------------
KNOWN ISSUES
Although the product has been tested several times and with different characters, in combination
with some (few) hair and clothing items, display errors may occur. Don't ask me what "goodies" the
guys have built into their hair/cloth products ...
You can recognize the mistakes by the fact that parts of the mask are missing, the model's skin
shows through and the whole thing looks half-burnt. The only way to fix this is to remove the
hair/clothing again. Please excuse this - even if the fault is not with my product.
-------------------------------------------------------------------------------------------------
SAVING A SCENE SUBSET
If you have followed my instructions above, this is very easy: Click File -> Save as -> Scene Subset
Choose a folder, enter a name and click "Save". A dialog box appears. Only select your model in this
dialog box. If you have lights, cameras or similar in the scene: untick! If you have switched on
Iray when creating the mask and see "Environment Options" or "Tone Mapping": untick!
After saving, you can load the model wearing your mask into any scene - or even better:
merge it into the scene. To merge (instead of loading), right-click on the icon of the saved
Scene Subset and select "Merge into Scene" from the context menu that opens. That's it.


