! REPORT
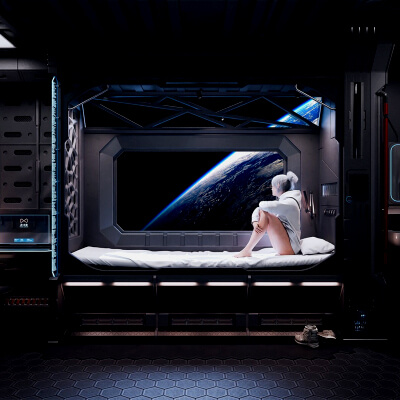
Mumei - The Nameless Piece
3D Render by MASSX_RZMUMEI | The Nameless Piece
I am Masoud Rezaei 3D artist and fashion enthusiast.
This is My second submission for the fashion contest 2. (My first Submission was VELORA.)
it was one month ago that I decided to enter this contest and as I said it before it also wasn't the first time I had missed the entire contest because I started too ambitious. so I made VELORA a much simpler idea which i finished in about two days and since then i have been working on MUMEI.
Now let me tell you about the concept and The Idea Behind this piece.
Concept.
to start, this is High Fashion, so for me the idea had to be more than something that is wore, it had to carry a message, a story. and the first thing that came to my mind was Dissociative identity disorder or DID. a subject that has recently become very interesting to me.
in this work I'm presenting a piece of many alters within the same person. I'm trying to visualize the contrast between these identities through fashion and color. Each layer speaks of a taste and personality while their coexistence within one reflects a complex unity. this is a glimpse of how identity can fracture and overlap.
Naming.
MUMEI is a Japanese word "" meaning nameless, I choose this name because of what i said before "I have a habit of naming my projects after a character. " but this isn't just one character it is many inside one, thus nameless.
Though I had a lots of anxiety that i won't be able to finish the project before the deadline, I'm happy that I did, and I am more than happy to share it with you.
Thank you for the opportunity.
A Brief Breakdown and WIP
To start I drew a few rough sketches of what i had in mind and then outlined one of them as the main concept.

for the character I'm using what i used for Velora, "Zsazsa" I did this since i already had customized her materials and i didn't want to remake them. except about a few hours before posting this and after hours of rendering the final shots it actually surprised me with a very small bug that i only noticed in the final stage. so i checked the renders once more and i fixed three tiny errors that i had with numbers on materials, one was with roughness of the body portion of the character and one with the black values of the floor and crowd since my monitor was showing something different than the display on my phone, i made sure both were as close as possible.
once i fixed these tiny errors i rerendered only the close up shots since i was already running out of time for editing and uploading.
the stage is also the same stage we should have used only i said this on Velora too, i separated the unique crowd members and then instanced them back to their original position, this gave me the ability to render from what ever angle i want and make sure the crowd is always facing the active camera with a simple geometry nodes setup.

now before posing my character i had to make the footwear since it did affect the way the character stands.
for the footwear I made a high heel and an ankle boot which i then UV unwrapped and textured in substance painter. here for the base of the laces I'm using an addon called Laces Generator i got this a while back when i was designing other footwear and its pretty handy, once the base of the lace is laid i then apply the modifiers and start customizing it so that it looks better and more natural without any bugs.
I also modeled the fishnet since it was pretty easy to do and i wanted it to work seamlessly with the ankle boot.
in almost all of my projects i do my best to keep my workflow as non-destructive as possible so that any future changes can be done easily. this also why you may actually see a lots of changes from the originals i screenshotted in the early stages.


once the footwear were done it was time for hair. and I love making hair, I do, I swear . jokes aside it has always been a very intimidating part of my job and anything intimating that i don't like i keep having to do. this is why i decided to do hair before anything else to get it out of the way and only get back to it once the pressure is reduced. now to be fair short hair isn't as intimidating but still, i had both. because why not.
for the hair I'm using geometry nodes as well, since as i said it creates more room for future changes.


This was the first phase of the hair, from here i kept experimenting with different setups and ideas until i got something that was good enough and i decided i need to manage my time better so i left it as it was but i did change it a bit more for the final render.


I liked the short hair but the long hair had a lots of problem that needed to be fixed, and the look wasn't really good, but again i had a lots of other things to do.
after the hair i started setting up my poses, to prepare the character for marvelous. i start by preparing some references and then finding the closest match to what i need on my pose library and if i don't have any matches I'll just pose from scratch which i actually did for most of theses poses. once posing is done I'll also make some shape keys for extreme poses, by this i mean for instance if she is sitting or her arms are bending and this is making her body parts overlap, I'll make a few shape keys and sculpt them to make sure the pose is looking right and that i don't have any major overlaps especially if that part is going to be covered with cloth. with this ill export as alembic so that all the animation information is baked perfectly.

I then import the alembic file into marvelous and start creating the base outfit, here i actually experimented with a few other ideas i had but ended up with what you see in the final render, also notice that not all parts are very detailed that is because i don't ever make everything with marvelous. having small complicated parts simulated all together with so many other pieces can create many glitches in the fabric, so to avoid this i mostly lay the foundation and then add the details in blender.

while animating i also kept getting this beautiful abstract piece of art which i liked but decided not to use it.(simulating with GPU can sometimes trigger this sort of glitches)

I then animated each pose and exported them individually into blender. I'm then using shape keys to make sure i have one object that has all poses stored inside of it, this saves a lots of time and creates a lots of room for future changes as well.


having the base prepared i then added the details, now i added a lots of details with lots of different techniques but let's make this brief and focus on only 4 parts.
the laces are using a simple geo nodes setup to turn the geometry into a curve which in fact looks like lace and don't need any more attention.
for the pleated part on her corset I'm making one pleat and then using an array to repeat it, once it has enough pleats i bind it to a simple plane and then I place the plane on the corset and give it more shape, i then apply the modifiers and give the pleats more shape and character by hand, once it's done' I'll then bind it to the corset, it is important to setup you garment correctly in marvelous before hand so that you won't have any problems later on, for instance in this case it needs to have enough geometry and also collision distance to make up for the absent part in the simulation.

for the pattern on the skirt I made a geometry setup that allowed me to draw my sequins on the 2D pattern of the skirt and then have it transferred to the actual skirt in Real-time, I could also draw directly on the 3D skirt and it would still stay on the same place in animations or different poses. it is the same for the flowers as well except a bit different since in the case of the flowers they also need to take the shape of the skirt as well. I modeled the flowers individually and not procedurally.


for the torn parts on the denim shorts, I made another geometry nodes setup which allowed me to create customizable tears where ever on the fabric i want and have full control over their looks and feels.
there is i believe an add on for this, tear painter if I'm not wrong, but with this project i wanted most things to be as original as possible and besides that i like to make my own tools since i understand them much better and they are made specific to my own needs.
the rest of the parts are either modeled by hand or procedurally modeled with geometry nodes.


with all the models done, at least to this stage, i started drawing my patterns which needed to be drawn, i drew the floral patterns and then took them to substance designer to make some of them look like embroidery, I'm then using some simple procedural techniques in blender to make them look like fishnets or embroidery on mesh fabrics, the floral trim above the fishnet thou is a texture i had from one of my old projects.
I also drew a rose for an embroidery on the shoes but ended up changing the color of the shoe and not using it.

I then started texturing certain parts i knew needed more details in substance painter and the rest are textured inside blender with simple shader techniques or simple textures.

finally, the final stage, lighting and color fixing.
i took like a few renders until i found something i actually liked.

more than 90 i guess. once i got a good lighting i then started rendering the final shots as 4K 128 samples which took its fare share of time too.
The renders I have Uploaded are straight out of blender, no lighting or anything has changed in those renders except I added a text for the thumbnail, I'm Also compressing the images with photoshop since originally i saved them without any compression.
At the End, Here are a few other renders I wanted to share with you.
Thank you.


To start I drew a few rough sketches of what i had in mind and then outlined one of them as the main concept.
for the character I'm using what i used for Velora, "Zsazsa" I did this since i already had customized her materials and i didn't want to remake them. except about a few hours before posting this and after hours of rendering the final shots it actually surprised me with a very small bug that i only noticed in the final stage. so i checked the renders once more and i fixed three tiny errors that i had with numbers on materials, one was with roughness of the body portion of the character and one with the black values of the floor and crowd since my monitor was showing something different than the display on my phone, i made sure both were as close as possible.
once i fixed these tiny errors i rerendered only the close up shots since i was already running out of time for editing and uploading.
the stage is also the same stage we should have used only i said this on Velora too, i separated the unique crowd members and then instanced them back to their original position, this gave me the ability to render from what ever angle i want and make sure the crowd is always facing the active camera with a simple geometry nodes setup.
now before posing my character i had to make the footwear since it did affect the way the character stands.
for the footwear I made a high heel and an ankle boot which i then UV unwrapped and textured in substance painter. here for the base of the laces I'm using an addon called Laces Generator i got this a while back when i was designing other footwear and its pretty handy, once the base of the lace is laid i then apply the modifiers and start customizing it so that it looks better and more natural without any bugs.
I also modeled the fishnet since it was pretty easy to do and i wanted it to work seamlessly with the ankle boot.
in almost all of my projects i do my best to keep my workflow as non-destructive as possible so that any future changes can be done easily. this also why you may actually see a lots of changes from the originals i screenshotted in the early stages.
once the footwear were done it was time for hair. and I love making hair, I do, I swear
. jokes aside it has always been a very intimidating part of my job and anything intimating that i don't like i keep having to do. this is why i decided to do hair before anything else to get it out of the way and only get back to it once the pressure is reduced. now to be fair short hair isn't as intimidating but still, i had both. because why not.for the hair I'm using geometry nodes as well, since as i said it creates more room for future changes.
This was the first phase of the hair, from here i kept experimenting with different setups and ideas until i got something that was good enough and i decided i need to manage my time better so i left it as it was but i did change it a bit more for the final render.
I liked the short hair but the long hair had a lots of problem that needed to be fixed, and the look wasn't really good, but again i had a lots of other things to do.
after the hair i started setting up my poses, to prepare the character for marvelous. i start by preparing some references and then finding the closest match to what i need on my pose library and if i don't have any matches I'll just pose from scratch which i actually did for most of theses poses. once posing is done I'll also make some shape keys for extreme poses, by this i mean for instance if she is sitting or her arms are bending and this is making her body parts overlap, I'll make a few shape keys and sculpt them to make sure the pose is looking right and that i don't have any major overlaps especially if that part is going to be covered with cloth. with this ill export as alembic so that all the animation information is baked perfectly.
I then import the alembic file into marvelous and start creating the base outfit, here i actually experimented with a few other ideas i had but ended up with what you see in the final render, also notice that not all parts are very detailed that is because i don't ever make everything with marvelous. having small complicated parts simulated all together with so many other pieces can create many glitches in the fabric, so to avoid this i mostly lay the foundation and then add the details in blender.
while animating i also kept getting this beautiful abstract piece of art which i liked but decided not to use it.(simulating with GPU can sometimes trigger this sort of glitches)
I then animated each pose and exported them individually into blender. I'm then using shape keys to make sure i have one object that has all poses stored inside of it, this saves a lots of time and creates a lots of room for future changes as well.
having the base prepared i then added the details, now i added a lots of details with lots of different techniques but let's make this brief and focus on only 4 parts.
the laces are using a simple geo nodes setup to turn the geometry into a curve which in fact looks like lace and don't need any more attention.
for the pleated part on her corset I'm making one pleat and then using an array to repeat it, once it has enough pleats i bind it to a simple plane and then I place the plane on the corset and give it more shape, i then apply the modifiers and give the pleats more shape and character by hand, once it's done' I'll then bind it to the corset, it is important to setup you garment correctly in marvelous before hand so that you won't have any problems later on, for instance in this case it needs to have enough geometry and also collision distance to make up for the absent part in the simulation.
for the pattern on the skirt I made a geometry setup that allowed me to draw my sequins on the 2D pattern of the skirt and then have it transferred to the actual skirt in Real-time, I could also draw directly on the 3D skirt and it would still stay on the same place in animations or different poses. it is the same for the flowers as well except a bit different since in the case of the flowers they also need to take the shape of the skirt as well. I modeled the flowers individually and not procedurally.
for the torn parts on the denim shorts, I made another geometry nodes setup which allowed me to create customizable tears where ever on the fabric i want and have full control over their looks and feels.
there is i believe an add on for this, tear painter if I'm not wrong, but with this project i wanted most things to be as original as possible and besides that i like to make my own tools since i understand them much better and they are made specific to my own needs.
the rest of the parts are either modeled by hand or procedurally modeled with geometry nodes.
with all the models done, at least to this stage, i started drawing my patterns which needed to be drawn, i drew the floral patterns and then took them to substance designer to make some of them look like embroidery, I'm then using some simple procedural techniques in blender to make them look like fishnets or embroidery on mesh fabrics, the floral trim above the fishnet thou is a texture i had from one of my old projects.
I also drew a rose for an embroidery on the shoes but ended up changing the color of the shoe and not using it.
I then started texturing certain parts i knew needed more details in substance painter and the rest are textured inside blender with simple shader techniques or simple textures.
finally, the final stage, lighting and color fixing.
i took like a few renders until i found something i actually liked.
more than 90 i guess. once i got a good lighting i then started rendering the final shots as 4K 128 samples which took its fare share of time too.
The renders I have Uploaded are straight out of blender, no lighting or anything has changed in those renders except I added a text for the thumbnail, I'm Also compressing the images with photoshop since originally i saved them without any compression.
At the End, Here are a few other renders I wanted to share with you.
Thank you.
REPLY
! REPORT
Here is every piece separated so that you may get better feel for them.


The flowers on this corset are oil painted red chrysanthemums, I drew them a while back for another project.


The flowers on this corset are oil painted red chrysanthemums, I drew them a while back for another project.
REPLY
! REPORT
Ok, I now officially feel out of the game lol.
Cheers mate, this is simply amazing and incredibly detailed
Cheers mate, this is simply amazing and incredibly detailed
REPLY
! REPORT
MASSX_RZ
Karma: 1,329
Mon, Sep 01, 2025Thank you so much, I’m glad you liked my work. Though please don’t feel discouraged. I believe this challenge has given us all an opportunity to contribute to the community and to grow our skills together. so In the end, we all gain something valuable, regardless of who wins.
By the way. I have checked your submission too, you have a pretty good concept and the fact that you have done everything yourself even without the use of marvelous makes it even more interesting and challenging. so good luck to you too.
By the way. I have checked your submission too, you have a pretty good concept and the fact that you have done everything yourself even without the use of marvelous makes it even more interesting and challenging. so good luck to you too.
TheSte89
Karma: 1,415
Wed, Sep 03, 2025Hey, just read your reply.
Don't get me wrong, I don't feel discouraged, but I knew my limits at the very start of this challenge. But, just right your said, I decided to join to improve my skills, to embrace a new challenge, to find out what I'm able to do and for the actual spirit "you'll never know if you don't try".
But I really appreciate your encouragement, cause I really like your work. It means a lot to me, so thank you for spending your time to check what I did.
MASSX_RZ
Karma: 1,329
Wed, Sep 03, 2025you have a great mindset. and honestly you are doing great. Thanks again for your kind comments.
Congratulations on being selected as an Honorable Mention in the contest. Great work!
Someone will be in contact with you soon regarding your prize.
Thanks for participating.
Someone will be in contact with you soon regarding your prize.
Thanks for participating.
REPLY
! REPORT
MASSX_RZ
Karma: 1,329
Mon, Sep 22, 2025thanks man, makes me happy that you think so, you did great as well.
Congratulations on the honorable mention. This is really cool! The judges sure had their hands full. 
REPLY
! REPORT
Congratulations on the honorable mention! But honestly, I think you deserve more. The judges really surprised me.
REPLY
! REPORT
MASSX_RZ
Karma: 1,329
Tue, Sep 23, 2025thank you so much reihan. i think some other people deserved to be at least on the honorable mentions too but like JohnnyLuck777 said, the judges sure had their hands full

Mumei - The Nameless Piece
 x3 [+]
Fri, Aug 29, 2025 733
733
 22
22
73327
22
Add to Collection

27 Likes
Share This Render


Software Used


Artist Stats
Member Since:
Karma:
Followers:
Likes Received:
Karma:
Followers:
Likes Received:
Jul, 2025
1,329
24
389
1,329
24
389
Gallery Images:
Wallpaper Images:
Forum Topics:
Marketplace Items:
Wallpaper Images:
Forum Topics:
Marketplace Items:
15
0
1
8
0
1
8

34

3