! REPORT
DA Monk G9 (Info)
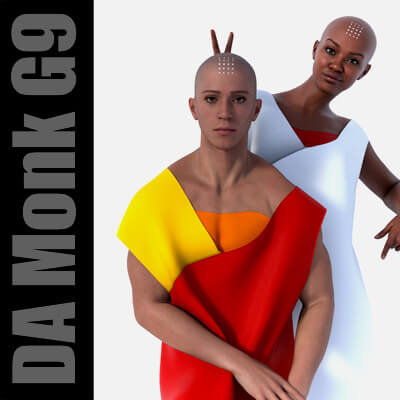
3D Render by Pushee-RiIt took me three tries to make this very (!) simple, yet highly flexible garment. I'm fascinated by layered clothing (such as the sari), which I wanted to create as a Drapeable ('DA'). Unfortunately, my first attempts using dForce failed, as neither a combined object (Blender: join) nor three individual garments produced good results after simulation. Mind you - we're talking about my Drapeables, not regular 3D clothing that shifts by 0.15 inches after the simulation.
Anyway, here's my DA Monk - simple, flexible, and with a very fast simulation
------------------------------------------------------
Some information from the readme.txt:
SIMULATION IS A MUST!
Without simulation, the 3D clothing looks very... well, let's just say "unusual". When talking about my "Drapeables" (like this project), I like to call it the "Pufferfish Look" It is only through simulation that the 3D clothing drapes itself on and around the model
BEFORE SIMULATION: START BONES FROM MEMORIZED POSE
Always turn this option ON! Even though the simulation takes longer, you will get better results with these settings. In addition, the mesh of the object and the material presets are optimized for fast simulation. Just give it a try: "Render Settings" pane -> Initialization -> Start Bones From Memorized Pose -> ON
POKE THROUGHS
The object has an enabled push modifier. If poke throughs occur after the simulation, you can increase the value of the modifier step by step until the errors disappear. Monk -> Parameters pane -> Mesh Offset
LOCATING THE SHELLS
Select the model in the Scene Pane and expand it. Below the Genesis Eyebrows you find:
Monk G9 -> the habit
Monk Basic Shell -> the painted on Bandeau Bra
Monk Head Shell -> the tatoo
Choose an object that you want to change and apply the material preset as usual
--------------------------------------
Enjoy
All base pictures without post proc
Anyway, here's my DA Monk - simple, flexible, and with a very fast simulation
------------------------------------------------------
Some information from the readme.txt:
SIMULATION IS A MUST!
Without simulation, the 3D clothing looks very... well, let's just say "unusual". When talking about my "Drapeables" (like this project), I like to call it the "Pufferfish Look"
It is only through simulation that the 3D clothing drapes itself on and around the modelBEFORE SIMULATION: START BONES FROM MEMORIZED POSE
Always turn this option ON! Even though the simulation takes longer, you will get better results with these settings. In addition, the mesh of the object and the material presets are optimized for fast simulation. Just give it a try: "Render Settings" pane -> Initialization -> Start Bones From Memorized Pose -> ON
POKE THROUGHS
The object has an enabled push modifier. If poke throughs occur after the simulation, you can increase the value of the modifier step by step until the errors disappear. Monk -> Parameters pane -> Mesh Offset
LOCATING THE SHELLS
Select the model in the Scene Pane and expand it. Below the Genesis Eyebrows you find:
Monk G9 -> the habit
Monk Basic Shell -> the painted on Bandeau Bra
Monk Head Shell -> the tatoo
Choose an object that you want to change and apply the material preset as usual
--------------------------------------
Enjoy
All base pictures without post proc