


 Free 3D
 3D Print Models
 3D Scans
 Animation & MoCap
 Textures
 Materials
 Skin Reference
 2D Game Assets
 Sound Effects
 Brushes & Tools
 Reference Photos
 Stock Images
 HDR Images
 3ds Max
 Maya
 Blender
 Unreal Engine
 Unity
 ZBrush
 Cinema 4D
 LightWave
 Marmoset
 SketchUp
 FBX
 DAE
 DXF
 GLB

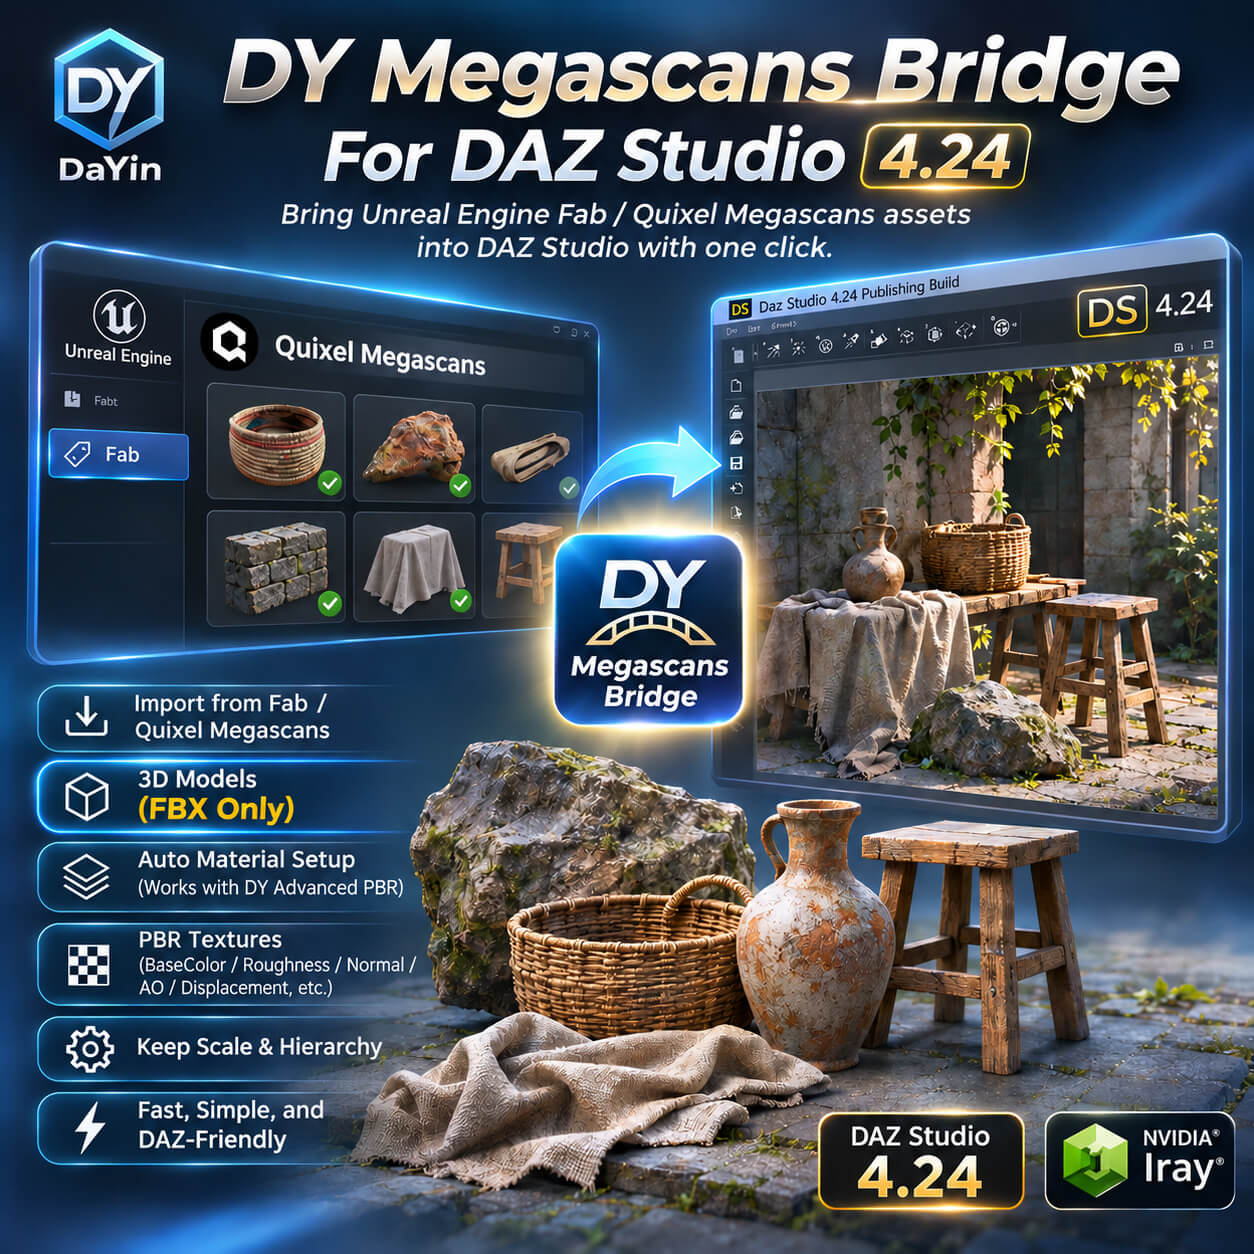
DY Megascans Bridge for Daz Studio 4.24

Not Rated Yet


This Item Was Made Using
! REPORT
NOTE: DIGITAL DOWNLOAD, NOT A PHYSICAL ITEM

Add to Collection

0 Likes
Required Products
Share This Daz Content


Top Rated Vendor

I am a DAZ Studio Content Creator.

License
Extended Use License
This item comes with our Extended Use Licensing. This means that you may use the model for both non-commercial and commercial purposes, in a variety of mediums and applications.
For full license terms, see our 3D Content Licensing Agreement
Item Details
| Vendor: | DaYin |
| Published: | Nov 19, 2026 |
| Download Size: | 151.3 KB |
| Software: | Daz Studio |
| dForce: | – |
Included Formats

Statistics
| Favorites: | 0 |
| Likes: | 0 |
| Views: | 176 |
Item Ratings
Not Rated Yet
DY Megascans Bridge for Daz Studio 4.24
================================================================================
DY Megascans Bridge v0.5.56 for DAZ Studio 4.24 (64-bit)
================================================================================
■ What it is
Imports your locally-owned Megascans / Fab assets into DAZ Studio and automatically
applies your DY Advanced PBR Shader (with all maps). Supports batch import.
■ Requirements
- DAZ Studio 4.24 or newer (64-bit).
- You must own and install "DaYin Advanced PBR Shader for DAZ Studio 4 and 6" (the companion
material product). The bridge applies its DY Advanced PBR preset to everything it imports; if
the shader is missing, "Import Selected" reports "DY Advanced PBR Shader is not installed in a
mapped DAZ content library" and nothing is imported at all - not even the model. One purchase
covers both Studio 4 and Studio 6. Product page:
dayin-advanced-pbr-shader-for-daz-studio-4-and-6
- The Microsoft Visual C++ runtime that DAZ Studio itself requires (already present if DAZ runs).
■ Install (extract into folder)
1. Close DAZ Studio completely.
2. Extract this archive into your DAZ Studio install folder (the one containing DAZStudio.exe),
e.g. C:\Program Files\DAZ 3D\DAZStudio4 Publishing Build\
This adds/updates: plugins\dymegascansbridge.dll
3. Reopen DAZ Studio.
4. Multiple Studio installs are separate programs - the 4.x Public Build, the Publishing Build, a
Private Build and Studio 6 each keep their own settings. Copy the DLL into every install folder
containing DAZStudio.exe you use, and put the shader's .mdl into each one's
%APPDATA%\DAZ 3D\\shaders\iray\ ; their content directory lists are separate too.
This release only supports Studio 4.24 (64-bit).
■ Usage
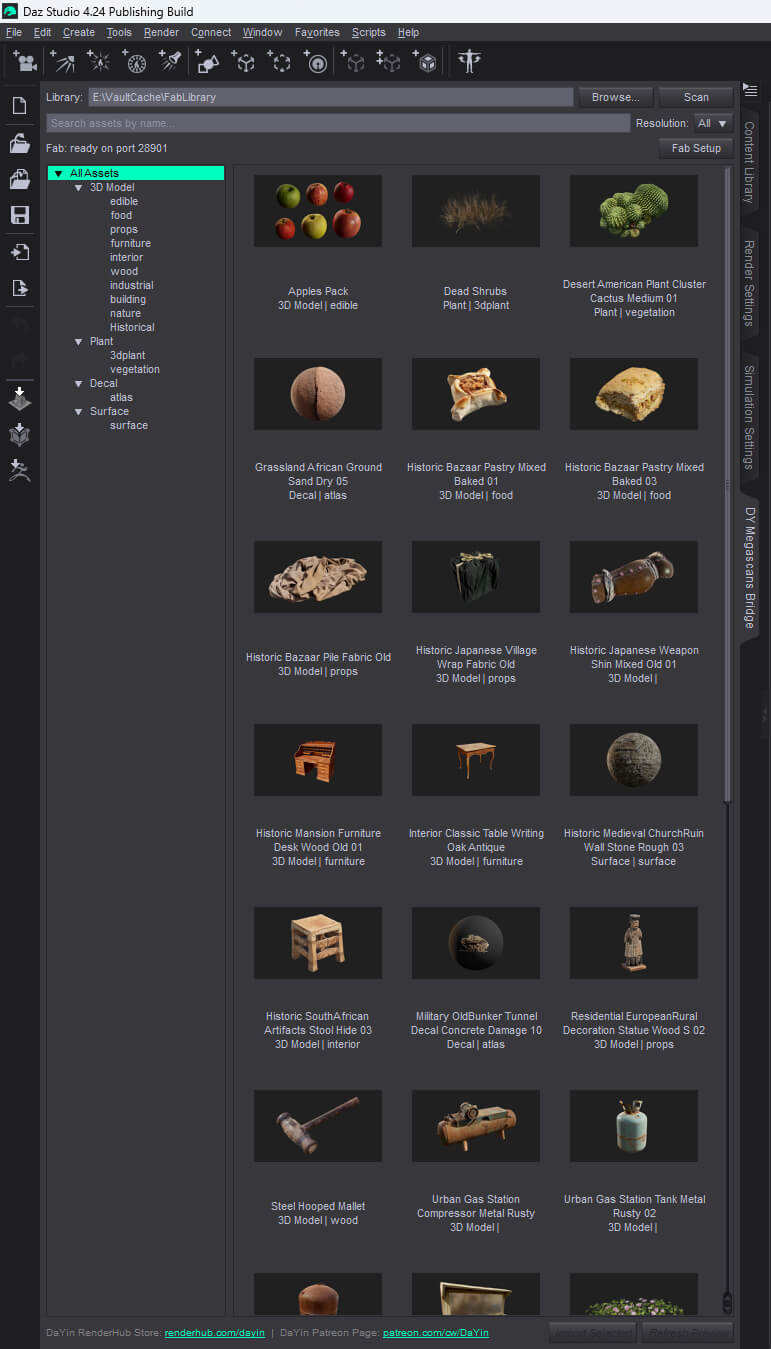
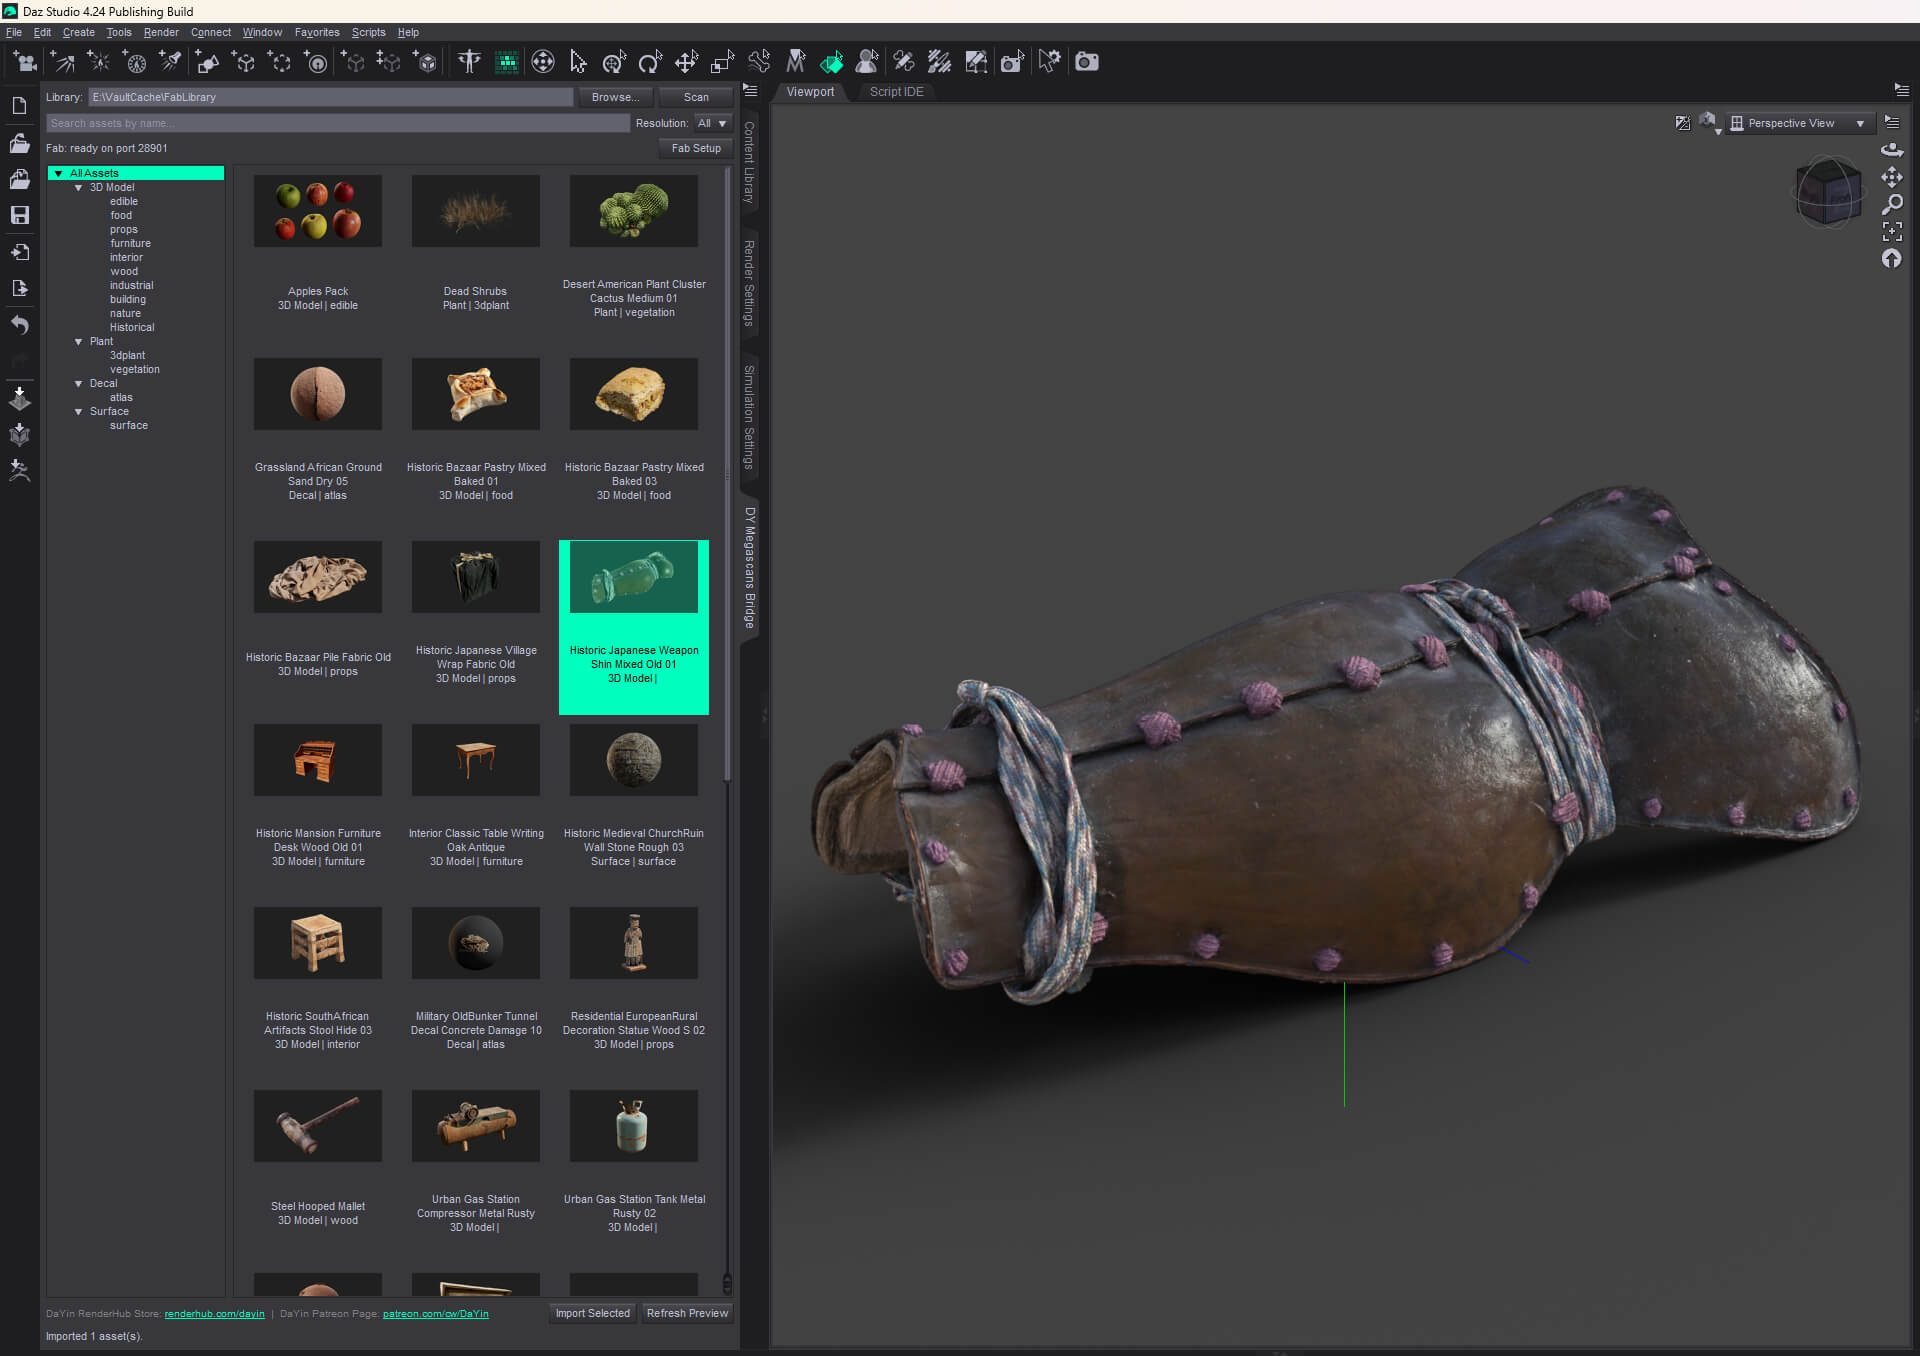
- Window > Workspace > DY Megascans Bridge to open the dockable panel.
- Enter your asset library folder in the panel's top field, then press Scan:
Fab users: point at the FabLibrary folder itself (e.g. E:\FabLibrary, or
…\EpicGamesLauncher\VaultCache\FabLibrary). Scanning the parent VaultCache also works
but pulls in non-Fab content and is slower.
Local Megascans users: point at your Megascans library root.
The path is remembered, so you only set it once.
- Select one or more assets (Ctrl / Shift for multi-select), then "Import Selected".
- A progress indicator (i / n) appears; failed items are listed, the rest still import.
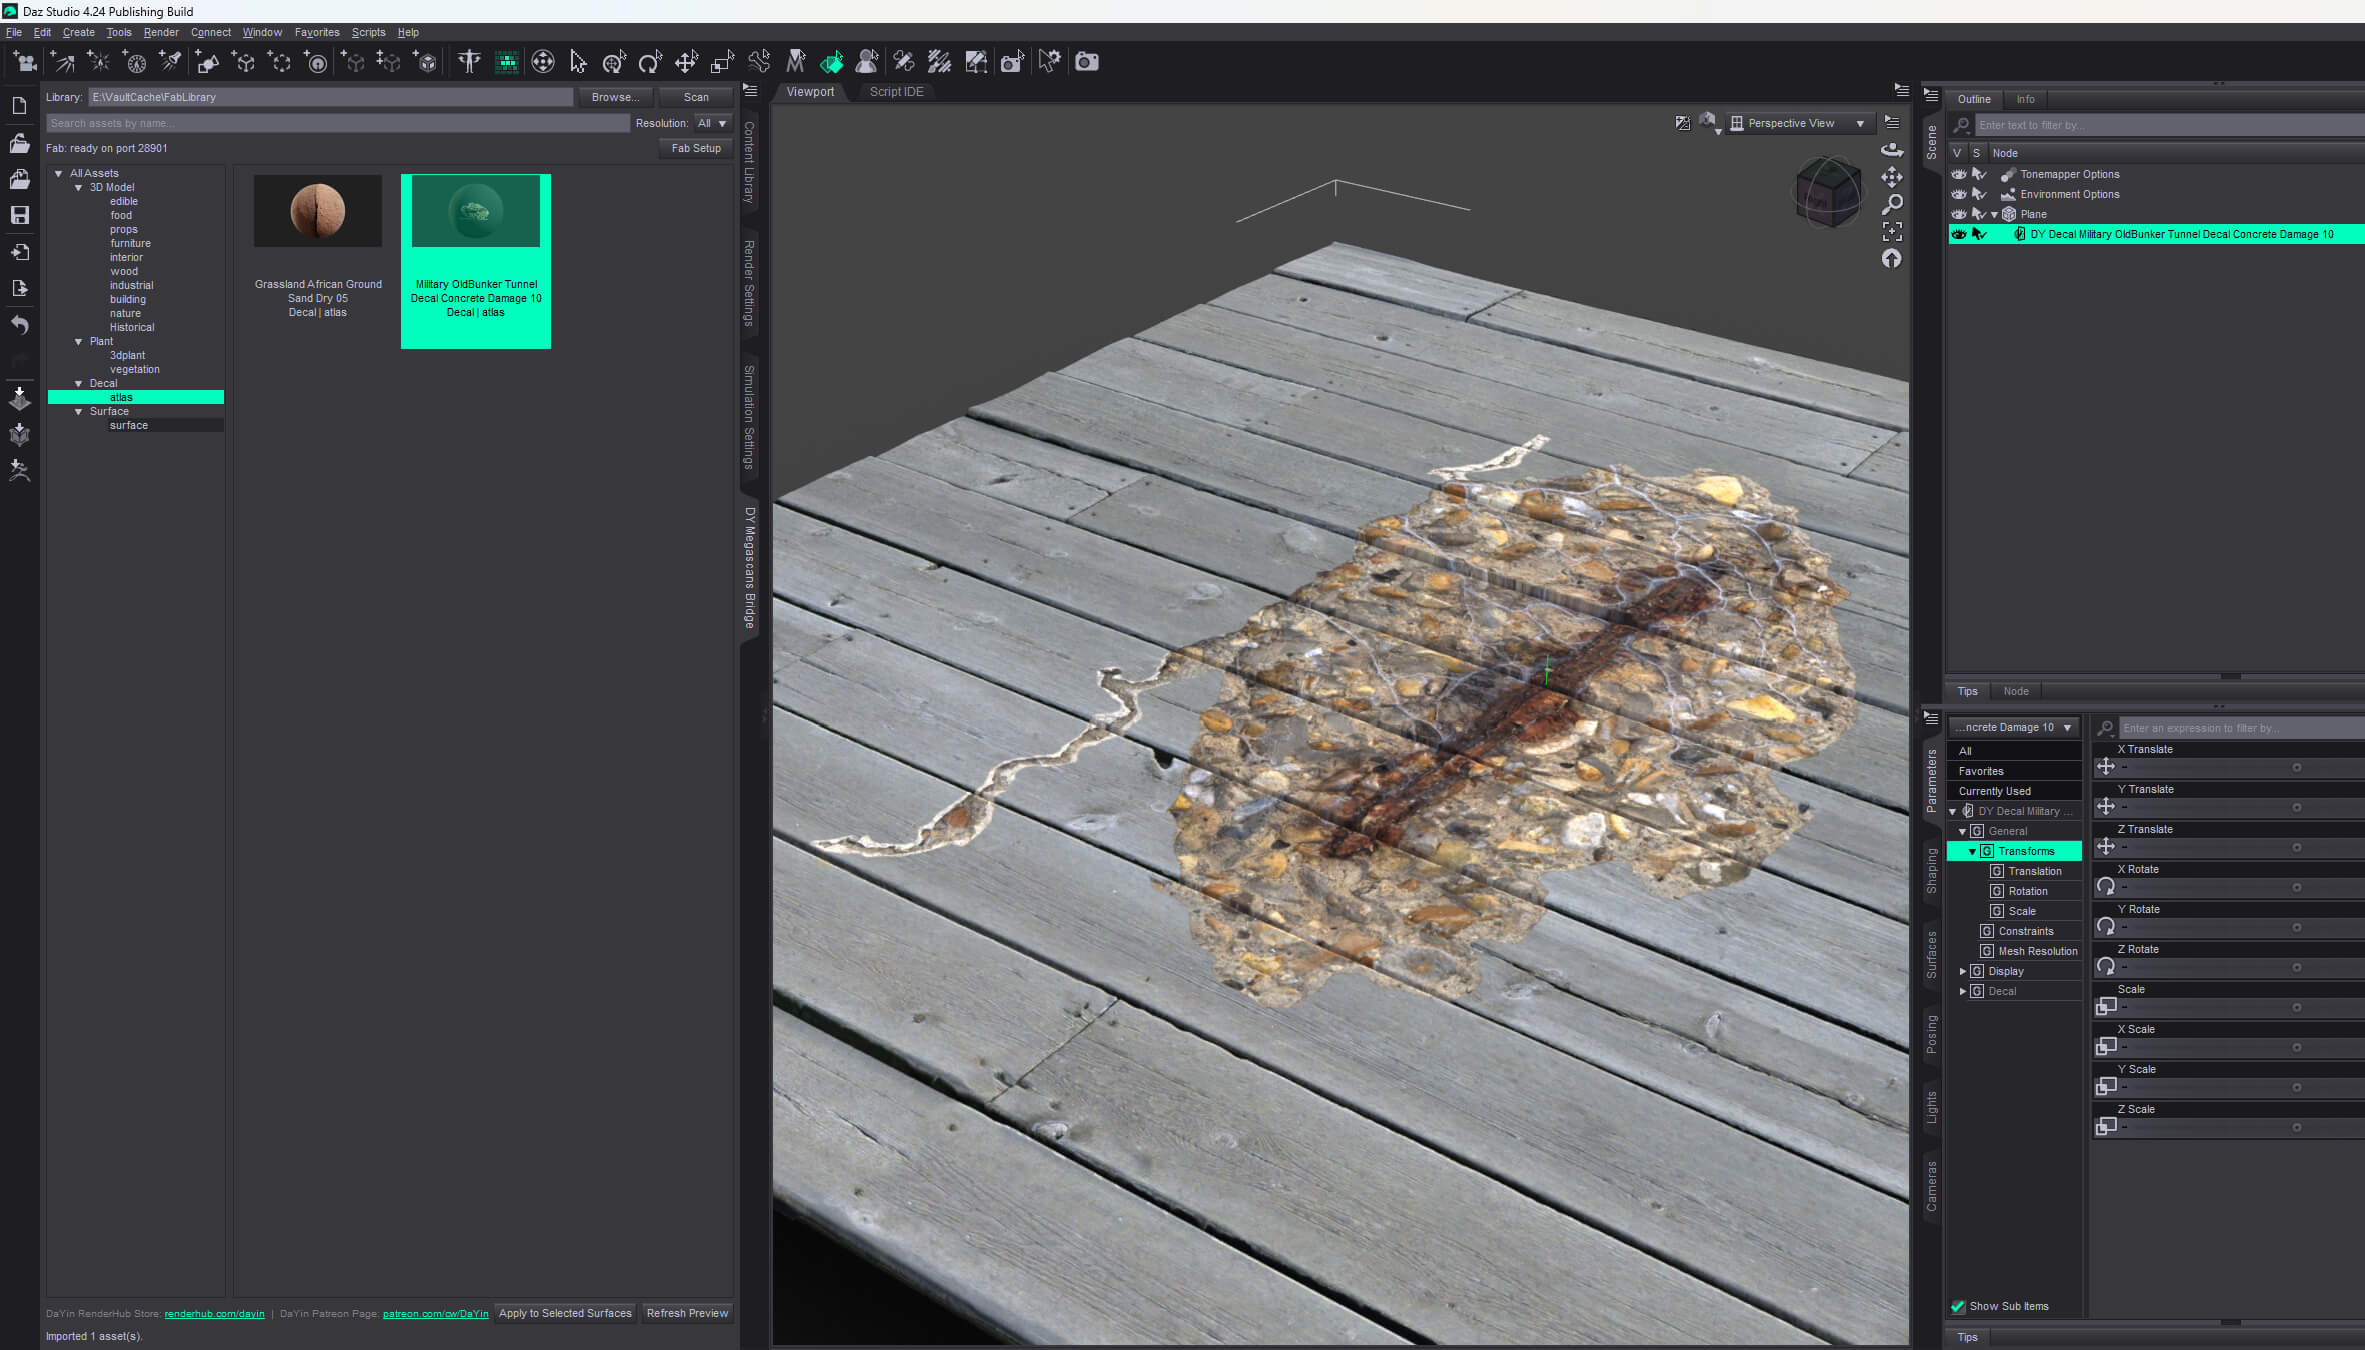
- Decals: assets Fab marks as decals (semanticTags asset_type "decal", including atlas
sheets whose names read like vegetation, e.g. ground/grass patches) have no model.
Select the object(s) the decal should project onto, then "Apply to Selected Surfaces":
the bridge creates a native Iray Decal Node parented to each target ("DY Decal …")
and shades it with the DY shader, so the decal OVERLAYS the base material (base
preserved). The projection box covers the target (with a finite depth margin so flat
planes work); the projector is rotated onto the target's thinnest axis with Object
texture coordinates, so the pattern lands unstretched on horizontal planes as well as
props and follows node moves. The soft-opacity mask hides everything outside the
decal pattern, so only the pattern shows; move/rotate/resize via the decal node's
General Transforms (or the viewport gizmo) and Clipping Width/Height/Depth.
Soft Opacity (Alpha Blend) is
enabled automatically for smooth grayscale edges.
Decals without an opacity map fall back to whole-surface application.
Nothing selected = an error asking you to pick a target.
Changing the target's base material afterwards (through the bridge or manually in
Surfaces) drops the decal from the render. To restore it, first delete the old
"DY Decal …" node under the target in the Scene pane, then apply the decal asset
to the target again; re-applying while the old node is still present does not work.
Tiling surface assets (category "surface") apply to the whole selected surface.
- Displacement: the Megascans scale is imported as the single amplitude control. Midlevel
(DY Shader v1.5, default 0.5) sets the zero-height texel value and removes the uniform
inflation that a fixed zero at texture 0 caused; it is a manual trim, not derived from
the JSON bias. On import the bridge always sets Midlevel to the height map's median so
off-center maps do not inflate the surface; Displacement Clamp (v1.6, default 0.5 =
unclamped) band-limits isolated outlier texels that spike thin geometry (rope straps) and
is auto-set only for maps carrying such spikes. Both stay manually adjustable in Surfaces.
Surface application without a metadata scale uses 5% of the largest selected object's
extent as amplitude (artistic policy, not a Fab calibration); with a metadata scale, and
for model imports, the absolute centimetre value is used.
Bias / Strength stay removed. SubD Displacement Level defaults to 3 so the relief is
visible without manual tweaking.
- Glass: the bridge does not guess glass. For window-type assets whose opacity map marks
the panes black, enable **Glass From Opacity Mask** on the material in the Surfaces pane
(DY Shader v1.4+): the black areas then render as refractive glass per texel instead of
cut-out holes, while white areas stay opaque and keep their relief. Leave it off for
foliage and hard-edge decals, whose black areas must stay holes.
- Plant / billboard sets: plant exports often ship a "Billboard" (impostor) texture set
beside the main atlas set. The bridge imports the 3D model with the main set and ignores
the billboard set (it belongs to billboard geometry, not the LOD model). Packs with
several plant variations (VarA, VarB, …) import one plant per variation, each at its
lowest LOD. Foliage translucency needs DY Advanced PBR Shader v1.9 or newer (older
versions tint the transmission gray and wash leaves out). If a folder has
only a billboard set, that set is used. Assets with several genuine per-material texture
sets (no main set) are still refused: separate material assignments are required.
Viewport note: the standard OpenGL viewport only approximates refractive glass and can
look patchy with overlapping faces; judge it by the Iray render or the Iray viewport
display style, not by the standard viewport.
- Optional: register the library folder as a DAZ content directory so saved scenes reference
its textures by library-relative path (see "Content library and paths").
■ Fab (Epic Games Launcher) setup (optional)
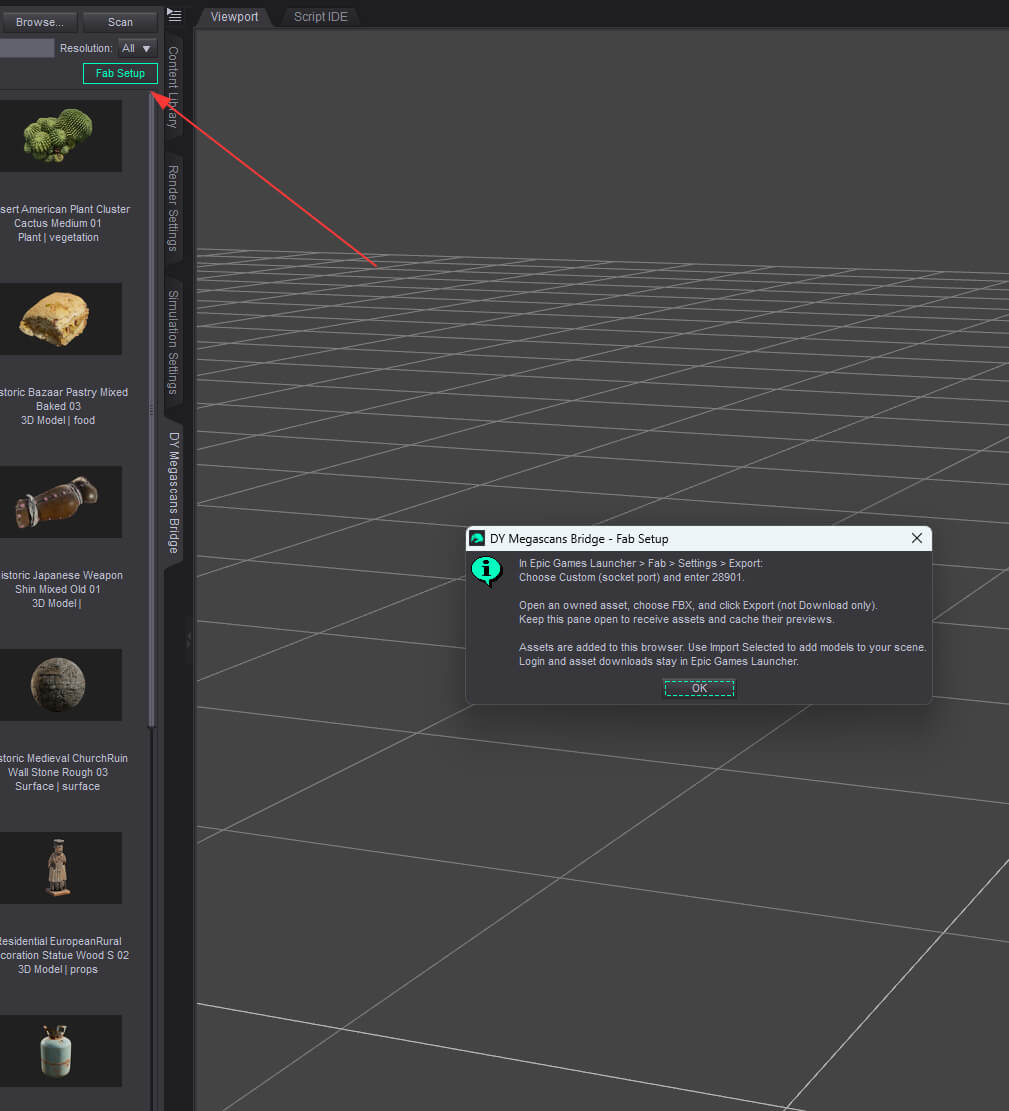
The pane listens on local port 28901 only - it makes no internet connection and uploads nothing.
Once configured, assets exported from Fab land in the pane automatically and each asset's Fab
listing image is downloaded and cached as its thumbnail.
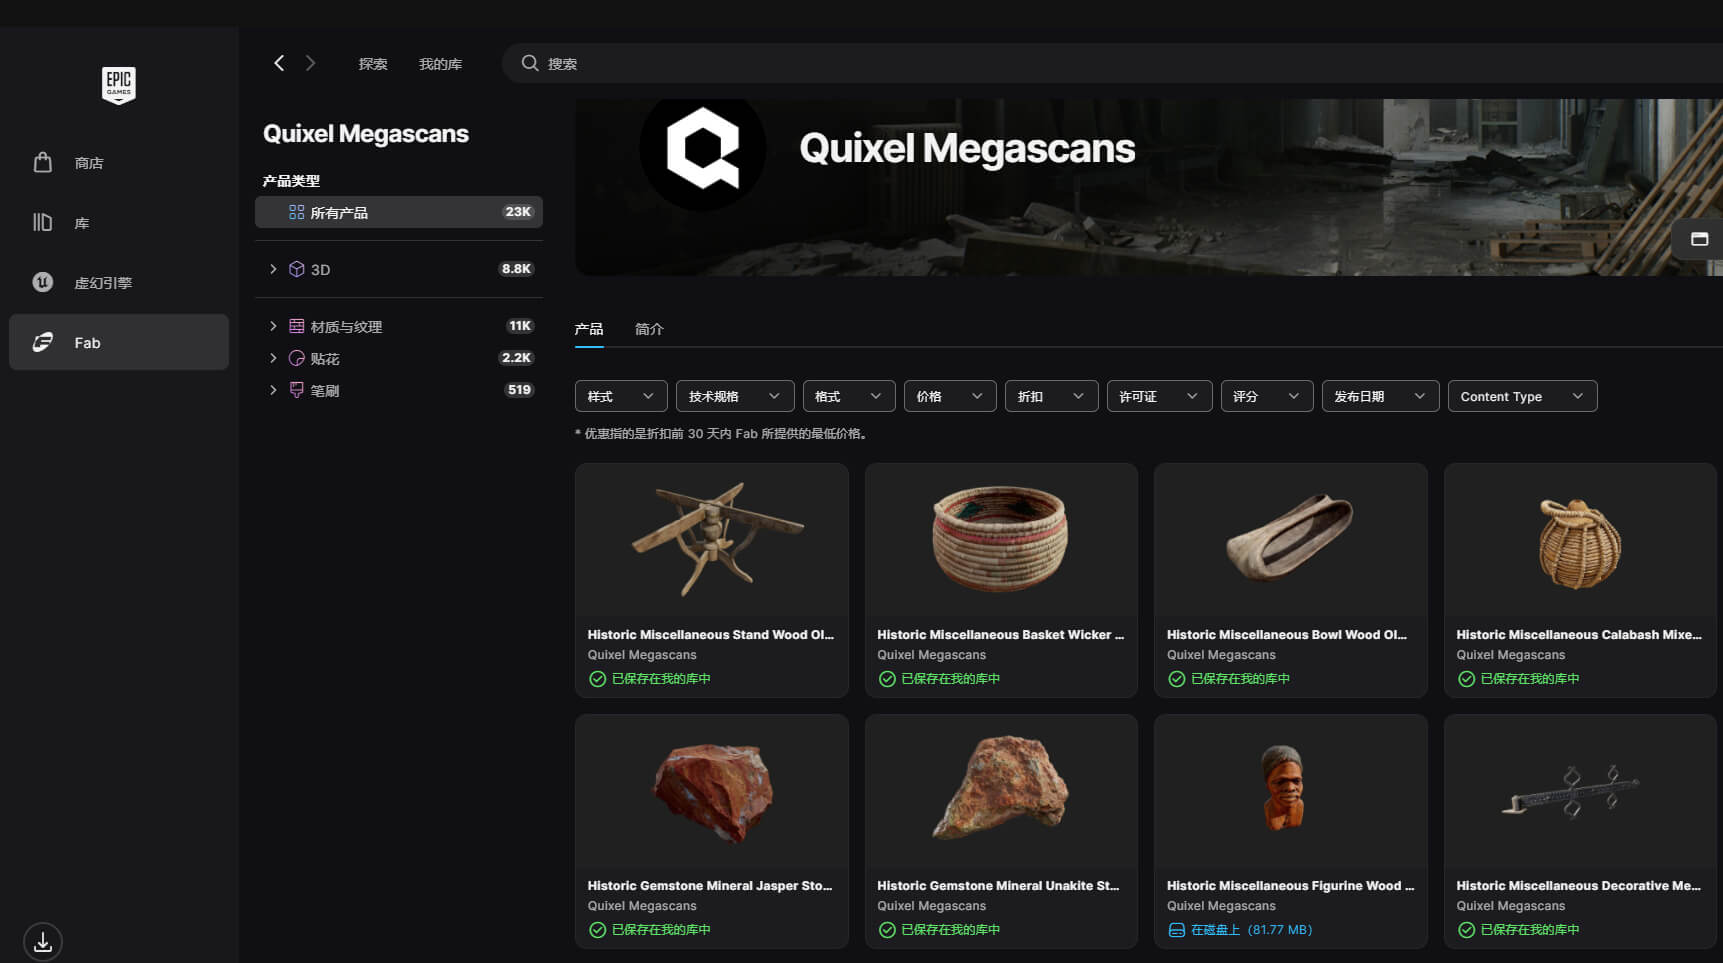
1. Open Epic Games Launcher and sign in, then go to Fab.
2. Recommended first: move the download location. The Fab section of the Launcher's Settings
defaults to the system drive
(C:\Users\\AppData\Local\EpicGamesLauncher\VaultCache\FabLibrary).
Fab assets are large, so a data drive such as E:\FabLibrary is a better home.
Note this only affects assets exported afterwards - already downloaded ones stay put,
so re-export them if you need them in the new place.
3. Still in the Fab section of Settings, find Export and choose Custom (socket port),
then enter 28901. This is a one-time setting; the Launcher remembers it.
4. Open the DY Megascans Bridge pane in DAZ Studio and put that FabLibrary folder in its top
field; the status line "Fab: ready on port 28901" means the receiver is listening.
5. In Fab, open an asset you own > choose FBX > click Export (not Download only).
6. The asset appears in the pane; its preview image is fetched in the background.
If one is missing, select it and click "Refresh Preview".
- The "Fab Setup" button in the pane shows these steps again at any time.
- Login and downloads always happen in Epic Games Launcher; this plugin has no access to your
Epic account and stores no credentials.
- Fab setup is optional: you can just point the pane at your local library folder instead,
in which case thumbnails fall back to texture maps.
- If the status line reports port 28901 is unavailable, close whatever holds it (e.g. another
DAZ Studio instance) and reopen the pane.
- To make map paths library-relative, add the content directory mapping manually as described
in "Content library and paths" above (optional).
■ Content library and paths (important)
- The plugin hardcodes no drive letter or library path. It locates the shader through whatever
content directories DAZ Studio has mapped, so your library can live on D:, E:, "My Documents"
or anywhere else - it only has to be registered in DAZ's Content Directory Manager
(installing products normally already does that).
- Keep only one version of the shader. If several mapped libraries contain
Shader Presets/DaYin/… or data/DaYin/DaYin Advanced PBR/…, DAZ uses the first match and
may pick the older copy, which shows up as untextured (white) renders. Delete the old files
before upgrading.
- The shader's .mdl module is not found through the content library. Install it into
%APPDATA%\DAZ 3D\\shaders\iray\ as its INSTALL.txt says; that location is
independent of where your library lives. The instance name is the one for the Studio you actually
run: 4.x Public Build or a Private Build = "Studio4", 4.x Publishing Build = "Studio4 Publishing
Build", Studio 6 = "Studio6" - the folder holding that instance's log.txt is the right one. The
shader product also ships an identical copy of the file in its own library folder
(data\DaYin\DaYin Advanced PBR\, byte-for-byte the same as the shaders\iray copy), but DAZ
does not search content libraries for MDL modules, so leaving it there is not an installation:
copy it into shaders\iray. Instances do not share that folder either - having it in Studio 6
says nothing about Studio 4. The plugin checks this before importing and, when the module is
missing, lists the copies it found elsewhere on your machine (another Studio instance, the
content library) so you can copy one straight into shaders\iray. Avoid
instead registering a library folder in
Shader Mixer > MDL Directory Manager: if you later move or rename the library that entry
fails silently and the material will not load (again, white renders).
- Fab textures: FabLibrary is not a DAZ content directory by default, so scenes reference the
maps by absolute path - move the download folder or send a scene to someone else and the maps
go missing. To avoid that, register the library folder as a DAZ content directory yourself:
Window > Panes (Tabs) > Content Directory Manager, then add the folder shown in the pane's top
field. Scenes then store library-relative URLs
(verified: with the mapping in place a saved scene reopens with all 7 maps and a complete DY
material; after removing it the same scene loses every map). Keep that mapping permanently -
do not delete it in Content Directory Manager - and note the Fab folders then appear in the
DAZ Content Library tree. Skipping the mapping does not affect importing or same-machine use.
- If the shader is installed but its MDL module is not on an MDL search path, the plugin checks
that before touching your scene: it looks in %APPDATA%\DAZ 3D\\shaders\iray\ (plus
whatever MDL Directory Manager registers for that instance) and, when dayin_advanced_pbr.mdl is
missing, lists the folders it searched and stops. DAZ crashes while loading the shader preset
without that file, so this keeps a failed import from half-applying. Choose Yes in the dialog if
you would rather take your chances. Nothing is shown when the module is in place; a module that
exists but is broken is still reported at import time instead of quietly handing you a scene
that renders untextured.
■ Uninstall
With DAZ Studio closed, delete plugins\dymegascansbridge.dll from the install folder.
■ License
No serial or online activation; purchase grants a license to use. Respect the licenses of
your Megascans / Fab assets. This plugin redistributes no original meshes or textures.
================================================================================
DY Megascans Bridge v0.5.56 for DAZ Studio 4.24 (64-bit)
================================================================================
■ What it is
Imports your locally-owned Megascans / Fab assets into DAZ Studio and automatically
applies your DY Advanced PBR Shader (with all maps). Supports batch import.
■ Requirements
- DAZ Studio 4.24 or newer (64-bit).
- You must own and install "DaYin Advanced PBR Shader for DAZ Studio 4 and 6" (the companion
material product). The bridge applies its DY Advanced PBR preset to everything it imports; if
the shader is missing, "Import Selected" reports "DY Advanced PBR Shader is not installed in a
mapped DAZ content library" and nothing is imported at all - not even the model. One purchase
covers both Studio 4 and Studio 6. Product page:
dayin-advanced-pbr-shader-for-daz-studio-4-and-6
- The Microsoft Visual C++ runtime that DAZ Studio itself requires (already present if DAZ runs).
■ Install (extract into folder)
1. Close DAZ Studio completely.
2. Extract this archive into your DAZ Studio install folder (the one containing DAZStudio.exe),
e.g. C:\Program Files\DAZ 3D\DAZStudio4 Publishing Build\
This adds/updates: plugins\dymegascansbridge.dll
3. Reopen DAZ Studio.
4. Multiple Studio installs are separate programs - the 4.x Public Build, the Publishing Build, a
Private Build and Studio 6 each keep their own settings. Copy the DLL into every install folder
containing DAZStudio.exe you use, and put the shader's .mdl into each one's
%APPDATA%\DAZ 3D\\shaders\iray\ ; their content directory lists are separate too.
This release only supports Studio 4.24 (64-bit).
■ Usage
- Window > Workspace > DY Megascans Bridge to open the dockable panel.
- Enter your asset library folder in the panel's top field, then press Scan:
Fab users: point at the FabLibrary folder itself (e.g. E:\FabLibrary, or
…\EpicGamesLauncher\VaultCache\FabLibrary). Scanning the parent VaultCache also works
but pulls in non-Fab content and is slower.
Local Megascans users: point at your Megascans library root.
The path is remembered, so you only set it once.
- Select one or more assets (Ctrl / Shift for multi-select), then "Import Selected".
- A progress indicator (i / n) appears; failed items are listed, the rest still import.
- Decals: assets Fab marks as decals (semanticTags asset_type "decal", including atlas
sheets whose names read like vegetation, e.g. ground/grass patches) have no model.
Select the object(s) the decal should project onto, then "Apply to Selected Surfaces":
the bridge creates a native Iray Decal Node parented to each target ("DY Decal …")
and shades it with the DY shader, so the decal OVERLAYS the base material (base
preserved). The projection box covers the target (with a finite depth margin so flat
planes work); the projector is rotated onto the target's thinnest axis with Object
texture coordinates, so the pattern lands unstretched on horizontal planes as well as
props and follows node moves. The soft-opacity mask hides everything outside the
decal pattern, so only the pattern shows; move/rotate/resize via the decal node's
General Transforms (or the viewport gizmo) and Clipping Width/Height/Depth.
Soft Opacity (Alpha Blend) is
enabled automatically for smooth grayscale edges.
Decals without an opacity map fall back to whole-surface application.
Nothing selected = an error asking you to pick a target.
Changing the target's base material afterwards (through the bridge or manually in
Surfaces) drops the decal from the render. To restore it, first delete the old
"DY Decal …" node under the target in the Scene pane, then apply the decal asset
to the target again; re-applying while the old node is still present does not work.
Tiling surface assets (category "surface") apply to the whole selected surface.
- Displacement: the Megascans scale is imported as the single amplitude control. Midlevel
(DY Shader v1.5, default 0.5) sets the zero-height texel value and removes the uniform
inflation that a fixed zero at texture 0 caused; it is a manual trim, not derived from
the JSON bias. On import the bridge always sets Midlevel to the height map's median so
off-center maps do not inflate the surface; Displacement Clamp (v1.6, default 0.5 =
unclamped) band-limits isolated outlier texels that spike thin geometry (rope straps) and
is auto-set only for maps carrying such spikes. Both stay manually adjustable in Surfaces.
Surface application without a metadata scale uses 5% of the largest selected object's
extent as amplitude (artistic policy, not a Fab calibration); with a metadata scale, and
for model imports, the absolute centimetre value is used.
Bias / Strength stay removed. SubD Displacement Level defaults to 3 so the relief is
visible without manual tweaking.
- Glass: the bridge does not guess glass. For window-type assets whose opacity map marks
the panes black, enable **Glass From Opacity Mask** on the material in the Surfaces pane
(DY Shader v1.4+): the black areas then render as refractive glass per texel instead of
cut-out holes, while white areas stay opaque and keep their relief. Leave it off for
foliage and hard-edge decals, whose black areas must stay holes.
- Plant / billboard sets: plant exports often ship a "Billboard" (impostor) texture set
beside the main atlas set. The bridge imports the 3D model with the main set and ignores
the billboard set (it belongs to billboard geometry, not the LOD model). Packs with
several plant variations (VarA, VarB, …) import one plant per variation, each at its
lowest LOD. Foliage translucency needs DY Advanced PBR Shader v1.9 or newer (older
versions tint the transmission gray and wash leaves out). If a folder has
only a billboard set, that set is used. Assets with several genuine per-material texture
sets (no main set) are still refused: separate material assignments are required.
Viewport note: the standard OpenGL viewport only approximates refractive glass and can
look patchy with overlapping faces; judge it by the Iray render or the Iray viewport
display style, not by the standard viewport.
- Optional: register the library folder as a DAZ content directory so saved scenes reference
its textures by library-relative path (see "Content library and paths").
■ Fab (Epic Games Launcher) setup (optional)
The pane listens on local port 28901 only - it makes no internet connection and uploads nothing.
Once configured, assets exported from Fab land in the pane automatically and each asset's Fab
listing image is downloaded and cached as its thumbnail.
1. Open Epic Games Launcher and sign in, then go to Fab.
2. Recommended first: move the download location. The Fab section of the Launcher's Settings
defaults to the system drive
(C:\Users\\AppData\Local\EpicGamesLauncher\VaultCache\FabLibrary).
Fab assets are large, so a data drive such as E:\FabLibrary is a better home.
Note this only affects assets exported afterwards - already downloaded ones stay put,
so re-export them if you need them in the new place.
3. Still in the Fab section of Settings, find Export and choose Custom (socket port),
then enter 28901. This is a one-time setting; the Launcher remembers it.
4. Open the DY Megascans Bridge pane in DAZ Studio and put that FabLibrary folder in its top
field; the status line "Fab: ready on port 28901" means the receiver is listening.
5. In Fab, open an asset you own > choose FBX > click Export (not Download only).
6. The asset appears in the pane; its preview image is fetched in the background.
If one is missing, select it and click "Refresh Preview".
- The "Fab Setup" button in the pane shows these steps again at any time.
- Login and downloads always happen in Epic Games Launcher; this plugin has no access to your
Epic account and stores no credentials.
- Fab setup is optional: you can just point the pane at your local library folder instead,
in which case thumbnails fall back to texture maps.
- If the status line reports port 28901 is unavailable, close whatever holds it (e.g. another
DAZ Studio instance) and reopen the pane.
- To make map paths library-relative, add the content directory mapping manually as described
in "Content library and paths" above (optional).
■ Content library and paths (important)
- The plugin hardcodes no drive letter or library path. It locates the shader through whatever
content directories DAZ Studio has mapped, so your library can live on D:, E:, "My Documents"
or anywhere else - it only has to be registered in DAZ's Content Directory Manager
(installing products normally already does that).
- Keep only one version of the shader. If several mapped libraries contain
Shader Presets/DaYin/… or data/DaYin/DaYin Advanced PBR/…, DAZ uses the first match and
may pick the older copy, which shows up as untextured (white) renders. Delete the old files
before upgrading.
- The shader's .mdl module is not found through the content library. Install it into
%APPDATA%\DAZ 3D\\shaders\iray\ as its INSTALL.txt says; that location is
independent of where your library lives. The instance name is the one for the Studio you actually
run: 4.x Public Build or a Private Build = "Studio4", 4.x Publishing Build = "Studio4 Publishing
Build", Studio 6 = "Studio6" - the folder holding that instance's log.txt is the right one. The
shader product also ships an identical copy of the file in its own library folder
(data\DaYin\DaYin Advanced PBR\, byte-for-byte the same as the shaders\iray copy), but DAZ
does not search content libraries for MDL modules, so leaving it there is not an installation:
copy it into shaders\iray. Instances do not share that folder either - having it in Studio 6
says nothing about Studio 4. The plugin checks this before importing and, when the module is
missing, lists the copies it found elsewhere on your machine (another Studio instance, the
content library) so you can copy one straight into shaders\iray. Avoid
instead registering a library folder in
Shader Mixer > MDL Directory Manager: if you later move or rename the library that entry
fails silently and the material will not load (again, white renders).
- Fab textures: FabLibrary is not a DAZ content directory by default, so scenes reference the
maps by absolute path - move the download folder or send a scene to someone else and the maps
go missing. To avoid that, register the library folder as a DAZ content directory yourself:
Window > Panes (Tabs) > Content Directory Manager, then add the folder shown in the pane's top
field. Scenes then store library-relative URLs
(verified: with the mapping in place a saved scene reopens with all 7 maps and a complete DY
material; after removing it the same scene loses every map). Keep that mapping permanently -
do not delete it in Content Directory Manager - and note the Fab folders then appear in the
DAZ Content Library tree. Skipping the mapping does not affect importing or same-machine use.
- If the shader is installed but its MDL module is not on an MDL search path, the plugin checks
that before touching your scene: it looks in %APPDATA%\DAZ 3D\\shaders\iray\ (plus
whatever MDL Directory Manager registers for that instance) and, when dayin_advanced_pbr.mdl is
missing, lists the folders it searched and stops. DAZ crashes while loading the shader preset
without that file, so this keeps a failed import from half-applying. Choose Yes in the dialog if
you would rather take your chances. Nothing is shown when the module is in place; a module that
exists but is broken is still reported at import time instead of quietly handing you a scene
that renders untextured.
■ Uninstall
With DAZ Studio closed, delete plugins\dymegascansbridge.dll from the install folder.
■ License
No serial or online activation; purchase grants a license to use. Respect the licenses of
your Megascans / Fab assets. This plugin redistributes no original meshes or textures.
================================================================================
Categories
