Free 3D
 3D Print Models
 3D Scans
 Animation & MoCap
 Textures
 Materials
 Skin Reference
 2D Game Assets
 Sound Effects
 Brushes & Tools
 Reference Photos
 Stock Images
 HDR Images
 3ds Max
 Maya
 Blender
 Unreal Engine
 Unity
 ZBrush
 Cinema 4D
 LightWave
 Marmoset
 SketchUp
 FBX
 DAE
 DXF
 GLB

! REPORT

Akari Aizawa (Coming Soon for Sale) Lighting Presets in Development
3D Render by snakeskinjktSorry for another long post!
If you're short on time, here's the one thing I'd like you to remember:
**My upcoming Akari Aizawa figure will include three bonus Iray lighting presets that I regularly use in my own renders!**
**By reducing the lighting intensity of an HDRI or turning off the lights included with an indoor environment, you can let these presets do most of the work. If you've ever loved a background but struggled to make your character look good in it, this lighting setup might make your life a whole lot easier!**
Here's a little introduction to how it works.
---
### Bonus: My Personal Iray Lighting Setup
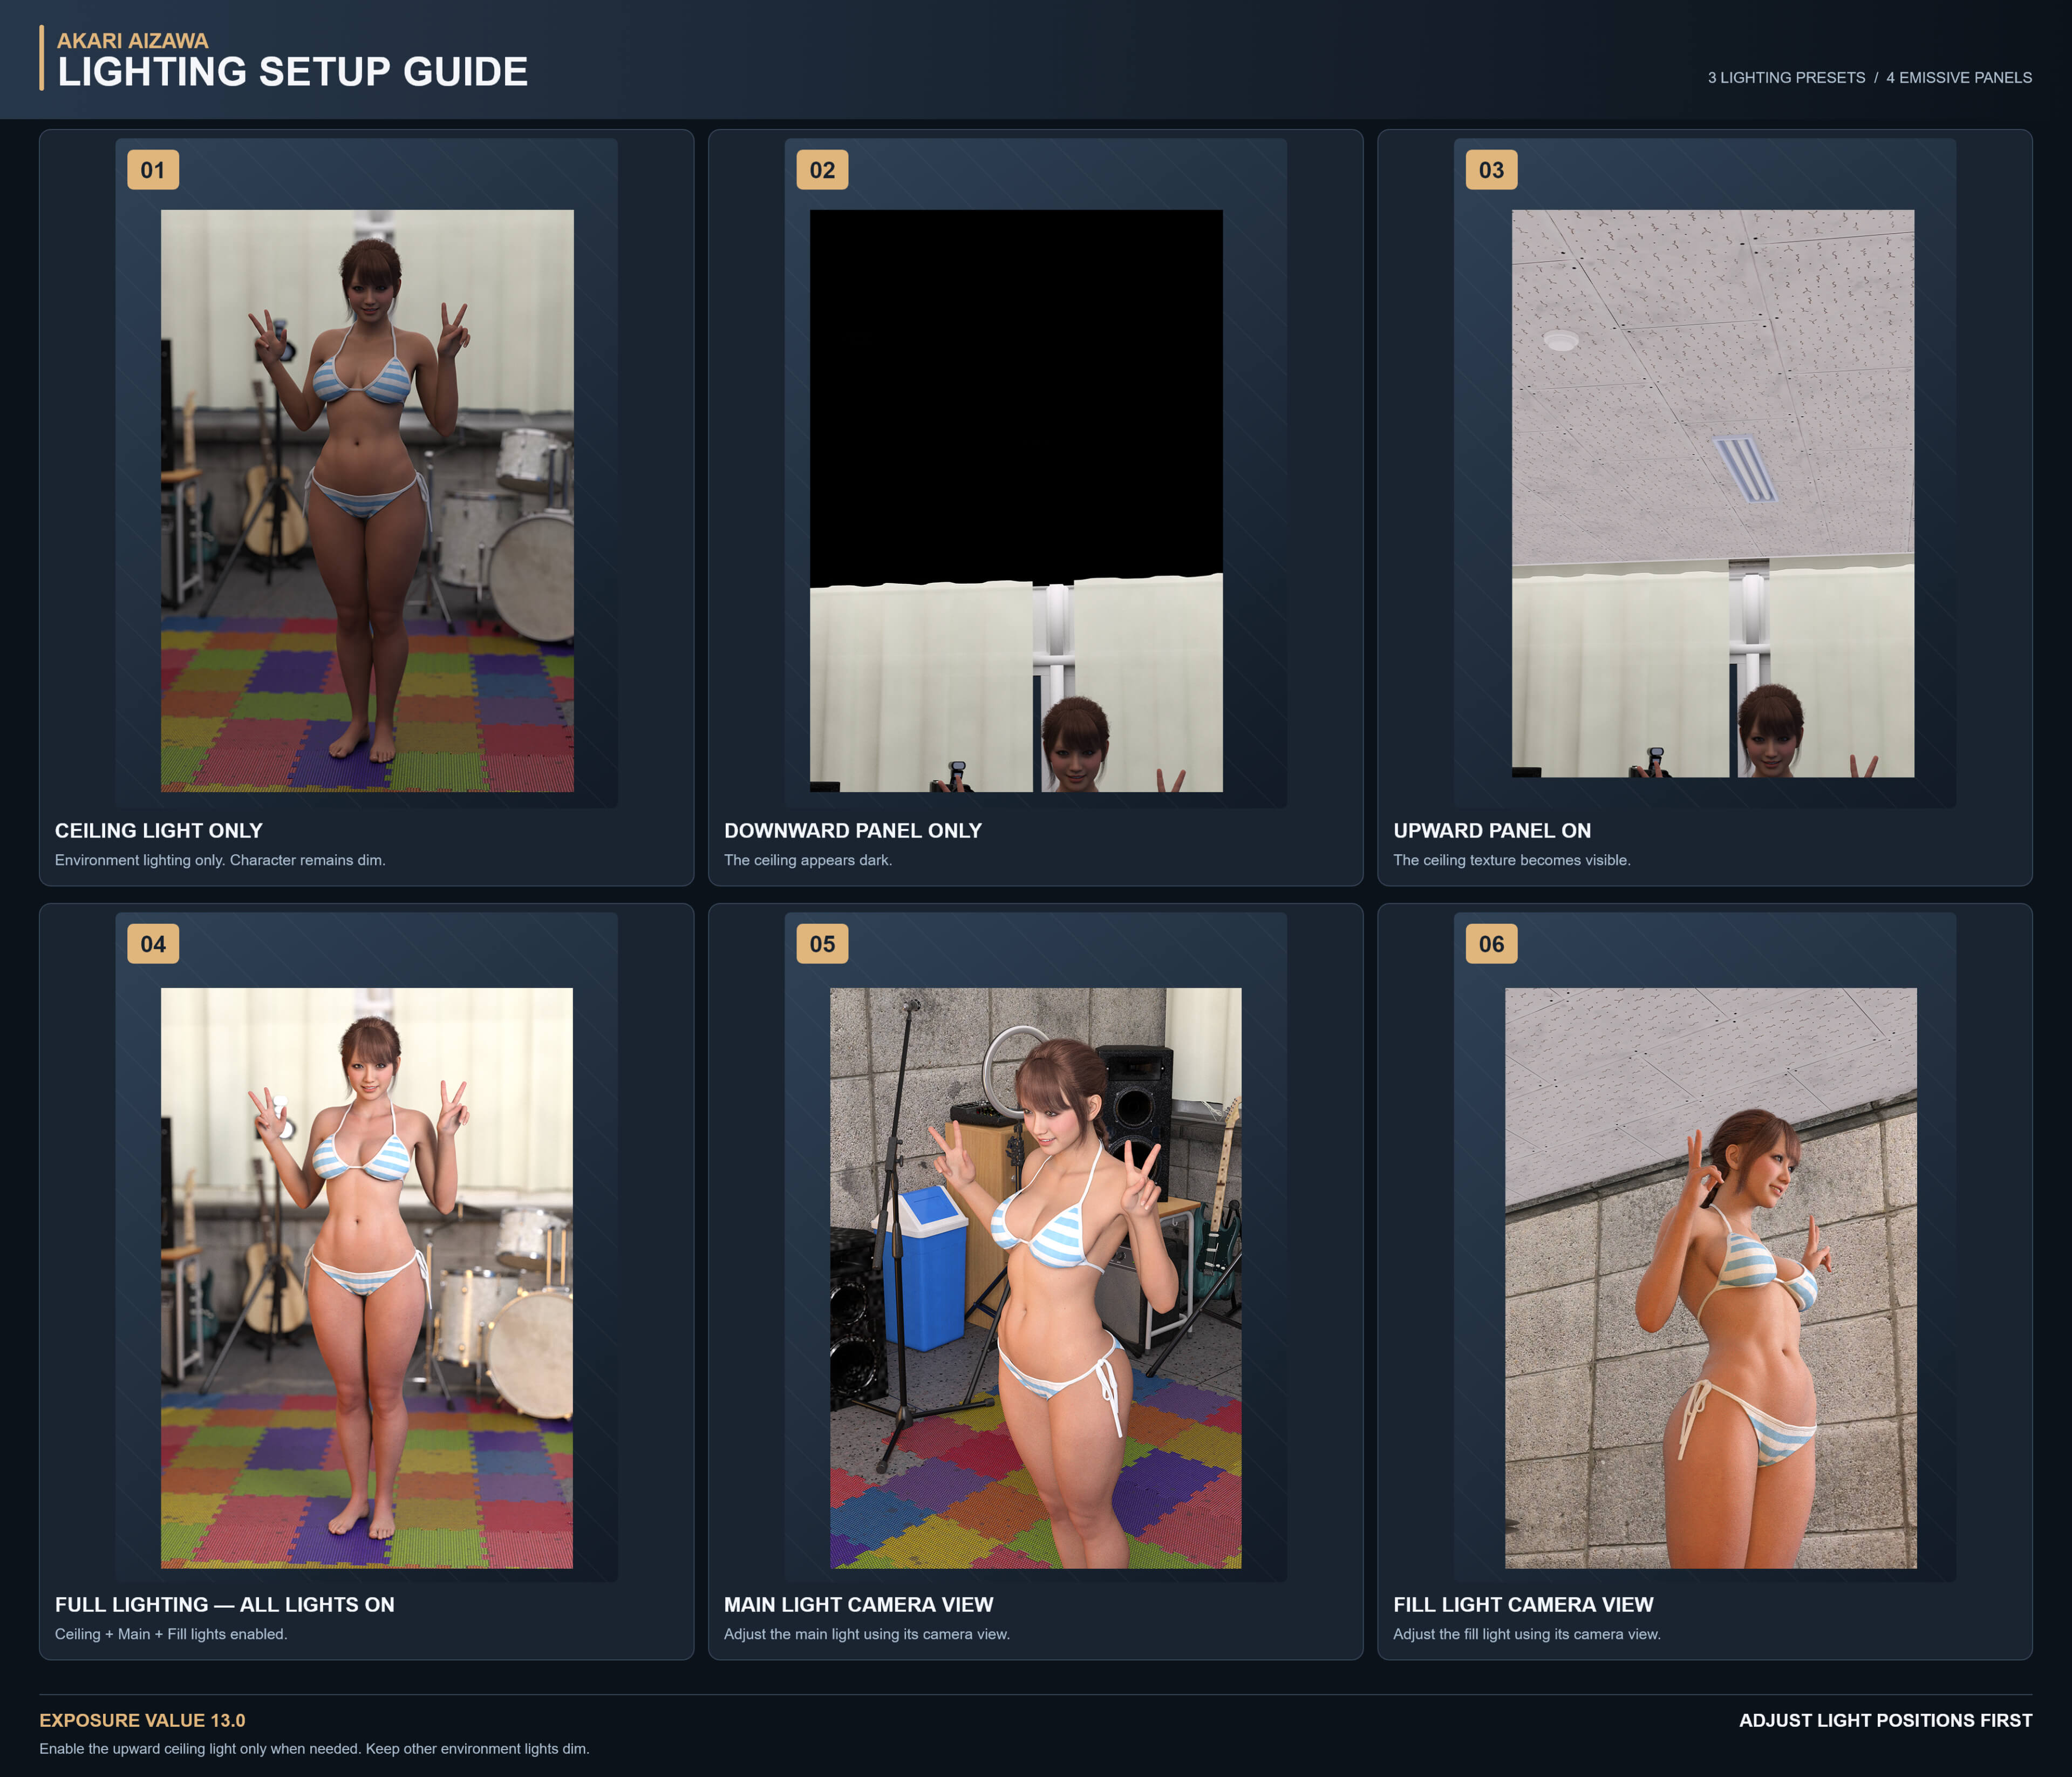
The set includes three presets: **Ceiling Dual Area Light, Main Light, and Fill Light**, using a total of four emissive planes.
I originally designed this setup mainly for rendering characters in indoor 3D environments, but I've found it surprisingly useful in many other situations as well.
### ■ A Little Trick for Ceiling Lighting (Images 1–3)
**Images 1–3** show the difference the ceiling lighting can make.
Instead of using a single double-sided emissive plane, I use two separate planes facing upward and downward.
This allows me to adjust their brightness independently, making it much easier to illuminate the ceiling naturally without making it too bright.
Feel free to adjust the size and brightness of these lights to suit your own environment.
### ■ Main Light and Fill Light (Image 4)
**Image 4** shows all three lighting presets enabled, including the ceiling lighting.
Since this setup was originally designed for indoor environments, I've made the lights a little stronger to account for possible obstructions.
For example, the Fill Light is intentionally a little brighter because part of it may be blocked by the floor.
I've also taken into account the possibility that around 20% of the Main Light's emitting surface could be obstructed by walls or furniture in a small room.
The ceiling lighting is also bright enough to illuminate the surrounding room.
Because of this, **the setup may look a little too bright if you render a character alone in a completely empty scene.**
If that happens, try moving the lights a little farther away from the character.
On the other hand, **sometimes the Main Light and Fill Light alone are all you need!**
They're also great for portrait renders, where you want the background to remain softly visible while keeping the character as the main focus.
### ■ Easy Light Positioning with Camera Controls (Images 5–6)
**Images 5 and 6** show the camera views attached to the Main Light and Fill Light.
These camera controllers allow you to adjust the lights using your mouse while viewing the character from the light's direction.
Personally, I find this much easier and more intuitive than adjusting light positions by entering numerical values.
One small note: occasionally, the viewport may turn completely black when switching to these cameras.
In my environment, simply zooming in and back out once with the mouse wheel restores the normal view.
### ■ My Recommended Lighting Tips
For exposure, I simply use the **default Exposure Value of 13.0** in Render Settings → Tone Mapping.
When adjusting the lighting, I recommend trying different light positions before changing their brightness.
And here's one little trick I'd especially like you to try:
**Swap only the color temperatures of the Main Light and Fill Light!**
Leave the light positions, brightness, and camera settings exactly as they are. Just exchange the warm and neutral color temperatures between the two lights.
It's almost like reversing the color balance of the lighting, and sometimes this tiny adjustment can make the character look surprisingly better!
### ■ Working with HDRI and Environment Lighting
My basic approach is simple:
**Let the Main Light and Fill Light handle most of the character lighting, and use the HDRI or existing environment lights mainly to create atmosphere.**
For example, sometimes I really love the background of a bright, sunny HDRI, but its strong lighting makes the character difficult to render nicely.
In situations like that, I reduce the HDRI's lighting intensity and let the Main Light and Fill Light take care of illuminating the character.
I use a similar approach with indoor environments, usually turning off the original lights or reducing their intensity until they contribute just enough atmosphere.
This way, **I can keep the background I like while having much more control over how the character looks.**
I especially like how this approach works not only in indoor environments, but also with HDRIs that would otherwise be difficult to light characters with.
It's a simple setup, but one that I've found incredibly useful in my own work.
I hope it makes your rendering work a little easier and helps you get the results you're looking for!
If you're short on time, here's the one thing I'd like you to remember:
**My upcoming Akari Aizawa figure will include three bonus Iray lighting presets that I regularly use in my own renders!**
**By reducing the lighting intensity of an HDRI or turning off the lights included with an indoor environment, you can let these presets do most of the work. If you've ever loved a background but struggled to make your character look good in it, this lighting setup might make your life a whole lot easier!**
Here's a little introduction to how it works.
---
### Bonus: My Personal Iray Lighting Setup
The set includes three presets: **Ceiling Dual Area Light, Main Light, and Fill Light**, using a total of four emissive planes.
I originally designed this setup mainly for rendering characters in indoor 3D environments, but I've found it surprisingly useful in many other situations as well.
### ■ A Little Trick for Ceiling Lighting (Images 1–3)
**Images 1–3** show the difference the ceiling lighting can make.
Instead of using a single double-sided emissive plane, I use two separate planes facing upward and downward.
This allows me to adjust their brightness independently, making it much easier to illuminate the ceiling naturally without making it too bright.
Feel free to adjust the size and brightness of these lights to suit your own environment.
### ■ Main Light and Fill Light (Image 4)
**Image 4** shows all three lighting presets enabled, including the ceiling lighting.
Since this setup was originally designed for indoor environments, I've made the lights a little stronger to account for possible obstructions.
For example, the Fill Light is intentionally a little brighter because part of it may be blocked by the floor.
I've also taken into account the possibility that around 20% of the Main Light's emitting surface could be obstructed by walls or furniture in a small room.
The ceiling lighting is also bright enough to illuminate the surrounding room.
Because of this, **the setup may look a little too bright if you render a character alone in a completely empty scene.**
If that happens, try moving the lights a little farther away from the character.
On the other hand, **sometimes the Main Light and Fill Light alone are all you need!**
They're also great for portrait renders, where you want the background to remain softly visible while keeping the character as the main focus.
### ■ Easy Light Positioning with Camera Controls (Images 5–6)
**Images 5 and 6** show the camera views attached to the Main Light and Fill Light.
These camera controllers allow you to adjust the lights using your mouse while viewing the character from the light's direction.
Personally, I find this much easier and more intuitive than adjusting light positions by entering numerical values.
One small note: occasionally, the viewport may turn completely black when switching to these cameras.
In my environment, simply zooming in and back out once with the mouse wheel restores the normal view.
### ■ My Recommended Lighting Tips
For exposure, I simply use the **default Exposure Value of 13.0** in Render Settings → Tone Mapping.
When adjusting the lighting, I recommend trying different light positions before changing their brightness.
And here's one little trick I'd especially like you to try:
**Swap only the color temperatures of the Main Light and Fill Light!**
Leave the light positions, brightness, and camera settings exactly as they are. Just exchange the warm and neutral color temperatures between the two lights.
It's almost like reversing the color balance of the lighting, and sometimes this tiny adjustment can make the character look surprisingly better!
### ■ Working with HDRI and Environment Lighting
My basic approach is simple:
**Let the Main Light and Fill Light handle most of the character lighting, and use the HDRI or existing environment lights mainly to create atmosphere.**
For example, sometimes I really love the background of a bright, sunny HDRI, but its strong lighting makes the character difficult to render nicely.
In situations like that, I reduce the HDRI's lighting intensity and let the Main Light and Fill Light take care of illuminating the character.
I use a similar approach with indoor environments, usually turning off the original lights or reducing their intensity until they contribute just enough atmosphere.
This way, **I can keep the background I like while having much more control over how the character looks.**
I especially like how this approach works not only in indoor environments, but also with HDRIs that would otherwise be difficult to light characters with.
It's a simple setup, but one that I've found incredibly useful in my own work.
I hope it makes your rendering work a little easier and helps you get the results you're looking for!
Very nice...will you be including a Hair style with your character, had another artist include a hair that suits their characters (N48Labs)....just thinking out loud. 
REPLY
! REPORT
Sorry! I actually tried making hair myself a while ago, but I quickly realized I couldn't compete with the amazing work of other talented artists, so I gave up on that idea! Haha.
There are already so many great hairstyles available, so I think it's better to leave that part to the experts and use their wonderful creations!
There are already so many great hairstyles available, so I think it's better to leave that part to the experts and use their wonderful creations!
REPLY
! REPORT
Akari Aizawa (Coming Soon for Sale) Lighting Presets in Development
[+] Give Award


Wed, Nov 04 47

 3
476
3
Add to Collection

6 Likes
Share This Render


Software Used
 Daz Studio

Artist Stats
Member Since:
Karma:
Followers:
Likes Received:
Karma:
Followers:
Likes Received:
Mar, 2024
973
12
491
973
12
491
Gallery Images:
Wallpaper Images:
Forum Topics:
Marketplace Items:
Wallpaper Images:
Forum Topics:
Marketplace Items:
48
0
0
0
0
0
0

31

4